Posted on

Gulf Coast Gardening: Bougainvillea for Year-Round Vibrant Color in Your Garden

Imperial Delight Bougainvillea

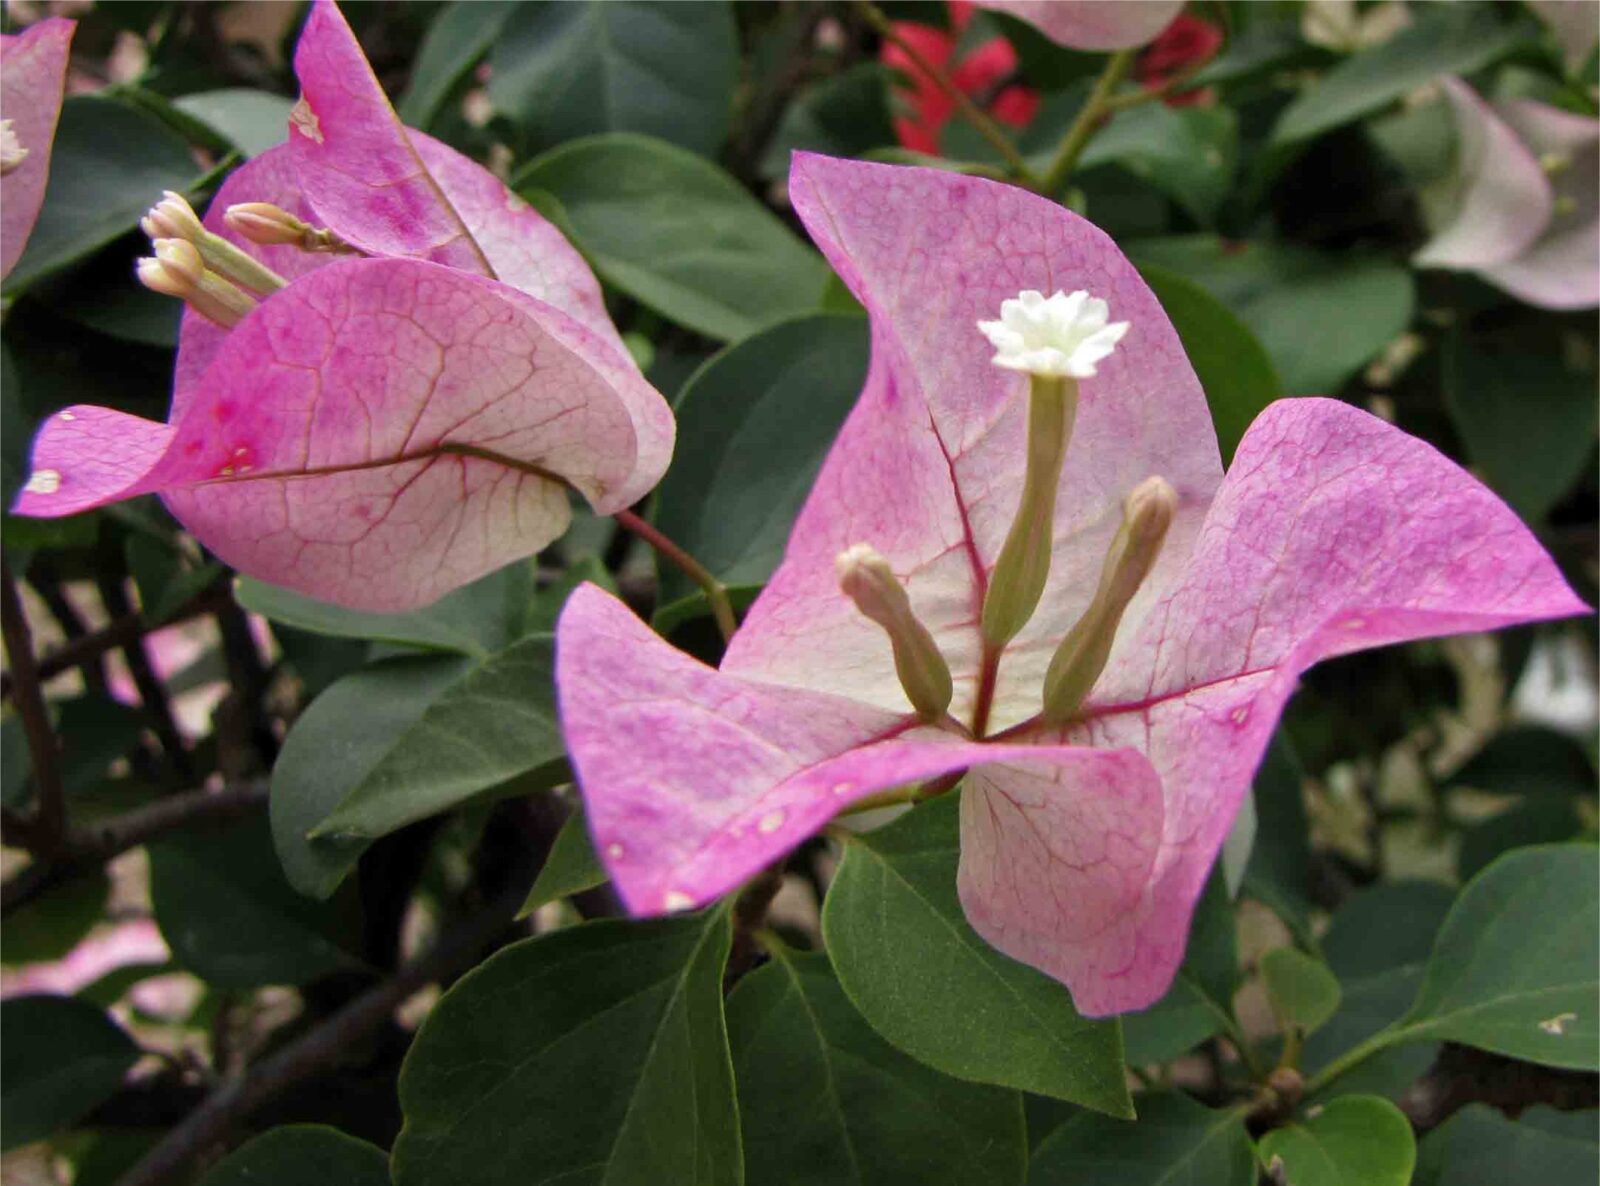
Bougainvillea (pronounced boo-guhn-VIL-yuh) is a stunning and vibrant flowering plant that originates from the tropical and subtropical regions of South America. Named after the French navigator Louis Antoine de Bougainville, who discovered the plant in Brazil during the 18th century, bougainvillea is now widely cultivated for its breathtaking display of color.

Bougainvillea is a vigorous and woody vine that can either climb or sprawl depending on its surroundings. It features glossy green leaves that are ovate in shape and slightly textured. The foliage provides a lush and verdant backdrop to the magnificent flowers that steal the show.

What we often perceive as bougainvillea’s flowers are, in fact, modified leaves called bracts. The true flowers of the plant are small and inconspicuous, nestled within the center of the bracts. These bracts come in a wide range of vibrant colors, including shades of pink, purple, red, orange, yellow, and white, creating a dazzling visual spectacle.

The showy bracts serve an important purpose for bougainvillea. They help attract pollinators like bees and butterflies to the true flowers concealed within. Once pollinated, the true flowers give way to small, inconspicuous fruit that contains tiny seeds.

Bougainvillea is perennial in mild climates, providing years of vibrant beauty to your garden. With proper care and maintenance, it can reach an impressive height of 15 to 30 feet and spread out over a similar distance, creating a sprawling and eye-catching display of color.

Bougainvillea Varieties: Dwarf, Semi-Dwarf, and Extra Large

Bougainvillea cultivars come in various sizes, allowing you to choose the perfect fit for your garden or landscape.

Dwarf Bougainvillea

dwarf bougainvillea
Dwarf Dougainvillea

Dwarf bougainvillea varieties are compact and well-suited for smaller gardens, containers, or areas where space is limited. They offer all the beauty of bougainvillea in a more manageable size range.

Popular Dwarf Bougainvillea Cultivars

‘Helen Johnson’: This dwarf variety features stunning magenta-pink bracts and a compact growth habit. It reaches a height of 3 to 4 feet and is perfect for borders or small spaces.

‘La Jolla’: ‘La Jolla’ displays vibrant pink bracts and has a trailing habit, making it an excellent choice for hanging baskets or cascading over walls. It grows to a height of 2 to 3 feet.

La Jolla Bougainvillea
George Hull, CC BY-SA 2.5, via Wikimedia Commons

‘Pixie Queen’: With its variegated bracts in shades of pink and white, ‘Pixie Queen’ adds a touch of elegance to any garden. It has a bushy growth habit and reaches a height of 2 to 3 feet.

‘Vera Purple’: This dwarf cultivar boasts intense purple bracts and a compact, rounded growth habit. It is well-suited for borders or containers, growing up to 3 to 4 feet in height.

‘Tango’: ‘Tango’ offers vibrant orange bracts and a semi-dwarf growth habit. It is a prolific bloomer and reaches a height of 3 to 4 feet, making it an eye-catching addition to any landscape.

Tango bougainvillea

‘Singapore Pink’: This dwarf variety showcases delicate pink bracts and a low, spreading growth habit. It grows to a height of 2 to 3 feet, making it ideal for ground cover or rock gardens.

Semi-Dwarf Bougainvillea

Semi-dwarf bougainvillea varieties offer a balance between compact size and impressive floral displays. They are well-suited for hedges, trellises, or as standalone specimens.

Popular Semi-Dwarf Bougainvillea Cultivars

‘Torch Red’: With its vibrant red bracts, ‘Torch Red’ adds a fiery splash of color to the garden. It has a semi-dwarf growth habit, reaching a height of 4 to 6 feet, and is perfect for accentuating fences or arbors.

Friedrich Haag, CC BY 3.0, via Wikimedia Commons

‘Double Gold’: This semi-dwarf cultivar features double-layered bracts in a dazzling golden-yellow hue. It has a bushy growth habit and grows to a height of 4 to 5 feet.

‘Raspberry Ice’: ‘Raspberry Ice’ displays striking raspberry-pink bracts with white accents. It has a semi-dwarf growth habit and reaches a height of 4 to 5 feet, making it a standout choice for borders or containers.

Photo by David J. Stang, CC BY-SA 4.0, via Wikimedia Commons

‘California Gold’: With its brilliant golden-yellow bracts, ‘California Gold’ adds a touch of warmth to the garden. It has a semi-dwarf growth habit, growing up to 4 to 6 feet in height.

‘Sundown Orange’: This semi-dwarf variety showcases vibrant orange bracts and a compact growth habit. It reaches a height of 4 to 5 feet, making it an attractive choice for landscaping or container planting.

‘Double Pink’: ‘Double Pink’ offers beautiful double-layered pink bracts and a semi-dwarf growth habit. It grows to a height of 4 to 6 feet and is a charming addition to any garden or patio.

Extra Large Bougainvillea

Extra large bougainvillea varieties make a bold statement in the landscape with their impressive size and profusion of colorful bracts. They are ideal for creating focal points or providing maximum coverage.

Popular Extra Large Bougainvillea Cultivars

‘Spectabilis’: ‘Spectabilis’ showcases stunning magenta bracts and has a vigorous climbing habit. It can reach a towering height of 20 to 30 feet, adding a dramatic touch to arbors or pergolas.

Forest & Kim Starr, CC BY 3.0, via Wikimedia Commons

‘San Diego Red’: This extra large variety features brilliant red bracts and a sprawling growth habit. It can reach a height and spread of 15 to 25 feet, creating a breathtaking display in the landscape.

‘Purple Queen’: ‘Purple Queen’ offers vibrant purple bracts and a climbing habit. It can grow up to 20 to 30 feet in height, making it a striking choice for trellises or fences.

Tomwsulcer, CC0, via Wikimedia Commons

‘Royal Purple’: With its rich purple bracts, ‘Royal Purple’ adds regal beauty to any garden. It has a vigorous climbing habit and can reach a height of 20 to 30 feet.

‘Miss Alice’: This extra large cultivar displays pure white bracts and a sprawling growth habit. It can grow up to 15 to 25 feet in height and spread, creating a stunning display against dark green foliage.

Miss Alice Bougainvillea
Dinesh Valke from Thane, India, CC BY-SA 2.0, via Wikimedia Commons

‘Rosenka’: ‘Rosenka’ offers unique apricot-colored bracts and a climbing habit. It can reach a height and spread of 20 to 30 feet, adding a warm and inviting touch to trellises or walls.

Ideal Growing Conditions for Bougainvillea

Bougainvillea thrives in hot and humid subtropical climates, making it an ideal choice for gardeners in the southern regions of the United States. It flourishes in regions with warm summers and mild winters, where temperatures rarely drop below freezing.

It is most commonly grown in USDA Hardiness Zones 9 through 11, encompassing areas such as the Gulf Coast, Southern Florida, and parts of California and Arizona.

To ensure the successful growth and blooming of your bougainvillea, it’s crucial to provide it with the optimal growing conditions. Here are the key factors to consider:

Type of Climate Required

Temperature

Bougainvillea thrives in temperatures between 60°F (15°C) and 90°F (32°C), with temperatures around 70°F to 85°F (21°C to 29°C) being ideal for growth and blooming.

It is important to protect the plant from freezing temperatures, as they can damage or kill it. If you live in an area prone to frost, consider growing bougainvillea in containers that can be moved indoors during colder months.

Temperature Tolerance

When temperatures consistently drop below 50°F (10°C), bougainvillea’s growth may slow down or temporarily cease. However, it can resume growth when warmer conditions return.

Temperatures below 32°F can cause damage to bougainvillea. Prolonged exposure to freezing temperatures can result in wilting, leaf discoloration, leaf drop, and damage to the stems and branches. In severe cases, it can lead to plant death.

Bougainvillea can tolerate high temperatures, but extreme heat, especially above 100°F, can stress the plant. It may result in wilting, scorched leaves, reduced blooming, and overall decline. Providing shade or ensuring adequate hydration during hot spells can help mitigate the effects of excessive heat.

Free pink flower and window image, public domain spring CC0 photo.

Humidity

Bougainvillea appreciates moderate to high humidity levels, which are typically found in subtropical regions.

If you live in a drier climate, you can increase humidity around the plant by misting it regularly or placing a tray filled with water near the plant to create a humid microclimate.

Sunlight Exposure

Bougainvillea thrives in full sunlight. It requires at least 6 to 8 hours of direct sunlight each day to produce an abundance of colorful bracts. Choose a location in your garden that receives ample sunlight and is not shaded by trees or buildings.

Ensure you plant bougainvillea in a location with maximum exposure to sunlight.

Soil Type

Bougainvillea prefers well-draining soil that is rich in organic matter. Sandy loam or loamy soil is ideal for bougainvillea cultivation. If your soil is heavy or clay-like, consider improving its drainage and fertility by adding compost or well-rotted manure.

Bougainvillea thrives in slightly acidic to neutral soil with a pH range of 6.0 to 7.0. Conduct a soil test to determine the pH of your garden soil. If the pH is outside the preferred range, adjust it by adding amendments.

For increasing acidity, use elemental sulfur, and for increasing alkalinity, add dolomite lime.

When and How to Plant Bougainvillea

The best time to plant bougainvillea in the ground is during the warm months of spring or early summer when the soil has warmed up and all danger of frost has passed. This allows the plant to establish its roots before the colder months arrive.

However, if you live in a region with mild winters, planting can also be done in fall.

Planting Bougainvillea Step-by-Step

When you’re ready to plant your bougainvillea, follow these steps:

Find a Good Location

Choose a location in your garden that receives full sunlight and has well-draining soil. Ensure there is enough space for the bougainvillea to grow and spread comfortably.

Prepare the Soil

Amend the soil by incorporating organic matter such as compost or well-rotted manure. This helps improve soil fertility, drainage, and water-holding capacity. Remove any weeds or debris from the planting area.

Dig the Planting Hole

Dig a hole that is twice as wide and deep as the bougainvillea’s root ball. This allows the roots to spread out easily. Ensure the hole is deep enough to accommodate the entire root system without bending or crowding.

Remove the Plant from its Container

Gently tap the sides of the container to loosen the root ball. Carefully slide the plant out, holding it by the base of the stems.

Planting the Bougainvillea

Place the root ball in the center of the planting hole, ensuring the top of the root ball is level with or slightly above the soil surface.

Backfill the hole with soil, firming it gently around the roots to eliminate air pockets.

Watering and Mulching

After planting, thoroughly water the bougainvillea to settle the soil and encourage root establishment.

Apply a layer of organic mulch, such as wood chips or straw, around the base of the plant, leaving a small gap around the stems to prevent rotting.

Care and Maintenance of Bougainvillea

Once you’ve planted your bougainvillea, you’ll want to make sure it thrives.

Red climbing bougainvillea

Watering Throughout the Year

During the active growing seasons of spring and summer, water bougainvillea deeply and thoroughly, allowing the soil to dry out slightly between waterings. Aim to provide regular, consistent moisture without waterlogging the roots.

Reduce watering frequency during the dormant period around late fall through the winter. Water sparingly, allowing the soil to dry out more between waterings.

However, ensure the plant doesn’t experience prolonged drought stress, especially as temperatures begin to rise in February.

Optimal Fertilizer Composition and Schedule:

Fertilize your bougainvillea according to its stage of development and the needs of the season.

Spring

Use a balanced fertilizer with equal NPK (nitrogen, phosphorus, potassium) ratios or a slightly higher nitrogen content.

Apply the fertilizer every 4 to 6 weeks during the active growing season.

Summer

Switch to a bloom-boosting fertilizer with a higher phosphorus content to promote abundant flowering. Apply every 6 to 8 weeks.

Fall and Winter

Reduce or suspend fertilization during the dormant period. Bougainvillea generally requires less fertilizer during this time.

Follow the instructions on the fertilizer package for specific application rates and guidelines. Then, adjust fertilization based on the plant’s response and the quality of your soil.

Protecting Bougainvillea from Cold

Bougainvillea in snow

Even though we can grow tropical plants, we can still get the occasional cold snap in Florida and in states around the Gulf Coast.

Our normally mild winters can even mean that a cold snap is that much more devastating to plants that aren’t equipped to deal with them.

How you protect your bougainvillea will vary depending on how long the cold snap is predicted to last.

Watering

If you’ve lived in Florida for any length of time, you know how insane our weather can be. In the winter, for example, the temperature during the day could be 85°F and then sink to 38°F during the night, usually with the lowest temperature right before sunrise.

This happens several times a year in Central Florida, sometimes in December, but usually in January and February.

If the forecast is for a brief overnight cold snap, you should water your bougainvillea well during the warmth of the day prior.

The moist ground will store the warmth of the sun during the day, carrying through the night. So, make sure you water as early as possible to make the most of the sunlight.

If the cold period is predicted to last through daylight hours or last for several nights, excess moisture in the soil is a bad thing. So, in that case, do not water your bougainvillea during cold days or when it will be below 40°F for several nights in a row.

Bougainvillea overhanging snowy steps
Sctamar, CC BY-SA 3.0, via Wikimedia Commons

Mulching

Whether your water or not, it’s a good idea to apply a thick layer of organic mulch around the base of the plant, extending it to cover the root zone. This helps insulate the soil and protect the roots from extreme cold.

Covering

Before the arrival of frost or freezing temperatures, cover the bougainvillea plant with a frost blanket or horticultural fabric. Secure the cover to the ground to create a protective barrier against cold winds.

I generally try to cover my plants well before sunset and the warmth of the day fade.

Container Plants

If you have bougainvillea in containers, move them to a sheltered location, such as a garage or greenhouse, during periods of freezing temperatures.

Pruning Bougainvillea for Optimal Growth and Shape

Pruning bougainvillea is essential for maintaining its shape, encouraging healthy growth, and promoting abundant flowering. Here’s a guide on how and when to prune your bougainvillea:

Timing of Pruning:

The best time to prune bougainvillea is during late winter or early spring, just before new growth begins. This timing allows the plant to recover and produce new shoots and blooms during the active growing season. However, minor pruning to remove dead or damaged branches can be done throughout the year. You may also need to prune it to keep it under control.

Tools Needed:

  • Pruning shears or sharp bypass hand pruners
  • Gardening gloves
  • Loppers or a pruning saw for thicker branches (if necessary)
  • Disinfectant solution (such as rubbing alcohol or bleach) to sterilize your pruning tools (before and after use) to prevent the spread of diseases.

The Pruning Process

Pruning bougainvillea while avoiding the thorns.

Follow these steps to prune your bougainvillea effectively:

Step 1: Assess the Plant:

Observe your bougainvillea and identify the branches that need to be pruned. Look for dead, damaged, or diseased branches, as well as any overly long or unruly growth that needs shaping.

Step 2: Prepare Your Tools:

Ensure your pruning tools are clean and sharp. Sterilize them with a disinfectant solution to prevent the spread of diseases from one plant to another.

Step 3: Prune Dead or Damaged Branches:

Start by removing any dead, damaged, or diseased branches. Make clean cuts just above a healthy bud or side branch, using sharp pruning shears. Cut at a slight angle to allow water to drain off the wound.

Step 4: Control the Plant’s Size and Shape:

To maintain the desired size and shape of your bougainvillea, selectively prune long or unruly branches. Identify branches that are extending beyond the desired boundaries or obstructing walkways, fences, or structures. Make pruning cuts just above a bud or side branch, leaving a stub of the branch to promote new growth.

Step 5: Thinning Out the Canopy (Optional)

If your bougainvillea is dense and overcrowded, you may consider thinning out the canopy to improve airflow and light penetration. Remove some of the interior branches to open up the plant and reduce the risk of pests or diseases.

Step 6: Clean Up and Disinfect:

After pruning, gather and remove the pruned branches and debris from the area. Dispose of them properly. Clean and disinfect your pruning tools with a sterilizing solution to prevent the spread of diseases.

Step 7: Post-Pruning Care:

After pruning, water your bougainvillea thoroughly to help it recover and encourage new growth. Apply a balanced fertilizer to provide the necessary nutrients for the plant’s recovery.

Remember, bougainvillea blooms on new growth, so avoid excessive pruning that removes too many potential blooming branches. Pruning should focus on maintaining the plant’s shape, removing dead or damaged branches, and promoting healthy growth.

Propagating Bouganvillea Cheap and Easy

The method works for me, so thanks to David the Good for this video.

Common Pests, Diseases, and Special Care for Bougainvillea

Bougainvillea, like any other plant, can be susceptible to certain pests, diseases, and specific care requirements. Here’s a breakdown of common pests, diseases, and special care for bougainvillea:

Common Bougainvillea Pests

Aphids

Aphids are small, soft-bodied insects that feed on plant sap, causing leaves to curl, yellow, or become distorted. To remedy aphid infestations, you can:

Spray a strong stream of water on the affected plant parts to dislodge the aphids.

Apply insecticidal soap or horticultural oil following the product instructions.

Introduce natural predators like ladybugs or lacewings to control aphid populations.

Caterpillars

Caterpillars, such as the bougainvillea looper or cabbage looper, can chew on leaves, causing significant damage. To remedy caterpillar infestations, you can:

Handpick and remove caterpillars from the plant.

Apply Bacillus thuringiensis (Bt), a biological insecticide that targets caterpillars.

Use insecticidal sprays labeled for caterpillar control, following the product instructions.

Whiteflies

Whiteflies are tiny, sap-sucking insects that cluster on the undersides of leaves, causing yellowing, leaf drop, and a sticky residue called honeydew. To remedy whitefly infestations, you can:

Use yellow sticky traps to capture adult whiteflies.

Spray the affected foliage with insecticidal soap or horticultural oil, ensuring thorough coverage.

Encourage natural predators like parasitic wasps or ladybugs to control whitefly populations.

Common Bougainvillea Diseases

Leaf Spot

Leaf spot diseases, caused by fungi, manifest as dark spots or lesions on the foliage. To remedy leaf spot diseases, you can:

Prune and remove affected plant parts to improve airflow and reduce disease spread.

Apply copper-based fungicides according to the product instructions.

Powdery Mildew

Powdery mildew appears as a white, powdery coating on leaves, stems, and flowers. To remedy powdery mildew, you can:

Prune and thin out the plant to improve airflow.

Apply fungicides labeled for powdery mildew control, following the product instructions.

Root Rot

Root rot is a fungal disease caused by overly wet or poorly draining soil. It leads to root decay, wilting, and overall decline of the plant. To remedy root rot, you can:

Improve soil drainage by amending the soil with organic matter.

Adjust watering practices to avoid waterlogging the roots.

Apply fungicides labeled for root rot control, following the product instructions.

Special Needs and Care for Bougainvillea

Pruning and Training

Regular pruning is essential for maintaining shape, promoting airflow, and removing dead or diseased branches. Train bougainvillea to climb or grow in a desired direction using trellises, fences, or stakes.

Support for Climbing Varieties

If you have climbing varieties, provide proper support structures like trellises, arbors, or wires to guide the vines and prevent damage to nearby structures.

Winter Protection in Colder Zones

In regions with colder winters, protect bougainvillea from freezing temperatures by covering with frost blankets, moving potted plants indoors, or providing a sheltered location.

Landscape Design Ideas and Companion Plants for Bougainvillea

Bougainvillea’s vibrant colors and sprawling growth make it a fantastic addition to any landscape design in subtropical regions. Here are some design ideas and appropriate companion plants to complement bougainvillea.

Design Ideas Using Bougainvillea:

Colorful Fences and Walls

Use bougainvillea to add a splash of color and create a living tapestry along fences or walls. The vibrant bracts will create an eye-catching display and provide a beautiful backdrop for your outdoor space.

Pergolas and Trellises

Train bougainvillea vines to climb and adorn pergolas, trellises, or arbors. The cascading bracts will create a stunning overhead canopy, providing shade and a vibrant atmosphere.

ManuelBarreira (talk · contribs), CC BY-SA 3.0, via Wikimedia Commons

Container Planting

Plant bougainvillea in large containers or pots to add a vibrant focal point to patios, balconies, or entryways. Choose compact or dwarf varieties to keep the plant size manageable and ensure it thrives in the container environment.

Courtyard Gardens

Create a Mediterranean-inspired oasis in your courtyard by incorporating bougainvillea. Use it as a backdrop for a tranquil seating area or plant it in containers for a burst of color amidst lush greenery.

Hedge or Border Planting

For privacy or to define garden boundaries, consider planting bougainvillea as a hedge or border. Prune it regularly to maintain a desired height and shape while enjoying its colorful display.

bougainvillea hedge
Fjmustak, CC BY-SA 4.0, via Wikimedia Commons

Companion Plants for Bougainvillea

Plumbago (Plumbago auriculata):

Plumbago’s delicate blue flowers provide a lovely contrast to the bold colors of bougainvillea. It is a versatile shrub that can be used as a low hedge or ground cover, adding depth and texture to the garden.

Mexican Flame Vine (Senecio confusus):

With its cascading orange or red flowers, Mexican Flame Vine creates a stunning combination when paired with bougainvillea. Allow it to climb or trail through the bougainvillea for a captivating display.

Dinesh Valke from Thane, India, CC BY-SA 2.0, via Wikimedia Commons

Dwarf Bottlebrush (Callistemon spp.):

Dwarf bottlebrush is known for its vibrant, brush-like flowers in shades of red, pink, or yellow. Planted alongside bougainvillea, it adds height variation and attracts pollinators to the garden.

Hibiscus (Hibiscus rosa-sinensis):

Hibiscus and bougainvillea together create a tropical paradise. The large, showy flowers of hibiscus complement the bracts of bougainvillea, enhancing the overall visual impact of the landscape.

Bush Morning Glory (Convolvulus cneorum):

With its silver foliage and delicate white flowers, bush morning glory offers a beautiful contrast to the vibrant bracts of bougainvillea. Plant it as a low-growing ground cover or in containers.

When selecting companion plants for bougainvillea, consider their sunlight, water, and soil requirements to ensure they are compatible. Aim for a harmonious combination that enhances the visual appeal and complements the colors and textures of bougainvillea.

Bougainvillea can be incorporated into various landscape designs, from vibrant walls and fences to container plantings and courtyards. Pairing it with appropriate companion plants adds depth and creates a visually stunning garden.

The Beauty and Versatility of Bougainvillea in Your Garden

Bougainvillea trellis

Bougainvillea, with its vibrant and abundant display of colorful bracts, is a true gem for subtropical gardens in USDA Zones 9 to 11. Its versatility, resilience, and stunning visual appeal make it a cherished addition to any landscape design. Bougainvillea’s ability to thrive in hot and humid climates, coupled with its preference for full sunlight, allows it to create a striking visual impact on walls, fences, trellises, and in containers. Whether used as a focal point, a living tapestry, or a cascading canopy, bougainvillea adds a touch of tropical beauty and splendor to outdoor spaces. With proper care, pruning, and companion planting, bougainvillea can transform your garden into a vibrant paradise, captivating the senses with its vivid colors and exuberant blooms. So, embrace the beauty of bougainvillea and let it infuse your garden with its warmth, charm, and botanical splendor.

FAQ – Frequently Asked Questions About Bougainvillea

Do bougainvillea like acidic soil?

Yes, bougainvillea prefers slightly acidic to neutral soil with a pH range of 6.0 to 7.0.

Do bougainvillea like coffee grounds?

Coffee grounds can be beneficial for bougainvillea as they help to slightly acidify the soil, which is favorable for their growth.

Is bougainvillea poisonous to dogs?

While bougainvillea is generally considered non-toxic to dogs, it’s always best to keep pets from ingesting any part of the plant to avoid potential digestive issues.

Do bougainvillea like sun or shade?

Bougainvillea thrives in full sunlight and requires at least 6 to 8 hours of direct sunlight each day for optimal growth and blooming.

Is bougainvillea better in pots or ground?

Bougainvillea can be grown both in pots and in the ground. However, they require proper care and attention in containers to ensure adequate drainage and regular watering.

How do you keep bougainvillea alive in the winter?

In colder regions, protect bougainvillea from freezing temperatures by covering them with frost blankets, moving potted plants indoors, or providing a sheltered location.

Do bougainvillea bloom year-round?

Bougainvillea typically blooms in cycles, producing vibrant bracts for several months at a time. While they may have intermittent blooms throughout the year, they don’t usually bloom year-round.

Do hummingbirds like bougainvillea?

Yes, hummingbirds are attracted to the bright and showy bracts of bougainvillea, making it a favorite plant to attract these delightful birds to your garden.

Does bougainvillea attract rodents?

Bougainvillea itself does not attract rodents. However, rodents may seek shelter in the dense foliage if the plant is grown against structures or near their nesting areas.

What month is best to plant bougainvillea?

Spring is the ideal time to plant bougainvillea, as the warmer temperatures and longer daylight hours promote healthy root establishment and growth.

Do bougainvillea need lots of water?

Bougainvillea prefers regular watering but should be allowed to dry out slightly between waterings. Avoid overwatering, as it can lead to root rot and other issues.

How do you get bougainvillea to spread?

Bougainvillea naturally spreads through its vining growth habit. You can encourage lateral spreading by pruning and training the plant, or by providing support structures for the vines to grow horizontally.

How do I keep my bougainvillea blooming all summer?

To keep bougainvillea blooming throughout the summer, ensure it receives adequate sunlight, provide regular watering, and fertilize appropriately during the active growing season.

How do you keep bougainvillea bushy?

Regular pruning helps to keep bougainvillea bushy and encourages branching. Prune back long or unruly branches to promote a compact and bushy growth habit.

Do you cut back bougainvillea?

Yes, bougainvillea benefits from regular pruning to maintain its shape, remove dead or diseased branches, and promote new growth. Pruning is typically done in late winter or early spring.

What does an overwatered bougainvillea look like?

An overwatered bougainvillea may exhibit yellowing leaves, wilting, root rot, and a general decline in health. The soil may feel excessively wet or waterlogged.

How often should bougainvillea be trimmed?

Bougainvillea can be trimmed as needed to control its size and shape. Major pruning is typically done once a year in late winter or early spring, but minor pruning for maintenance can be done throughout the year.

Featured Image via Wikimedia 阿橋 HQ, CC BY-SA 2.0, via Wikimedia Commons

Posted on

Gulf Coast Gardening: Duranta Erecta’s Tropical Splendor

Duranta erecta with butterfly

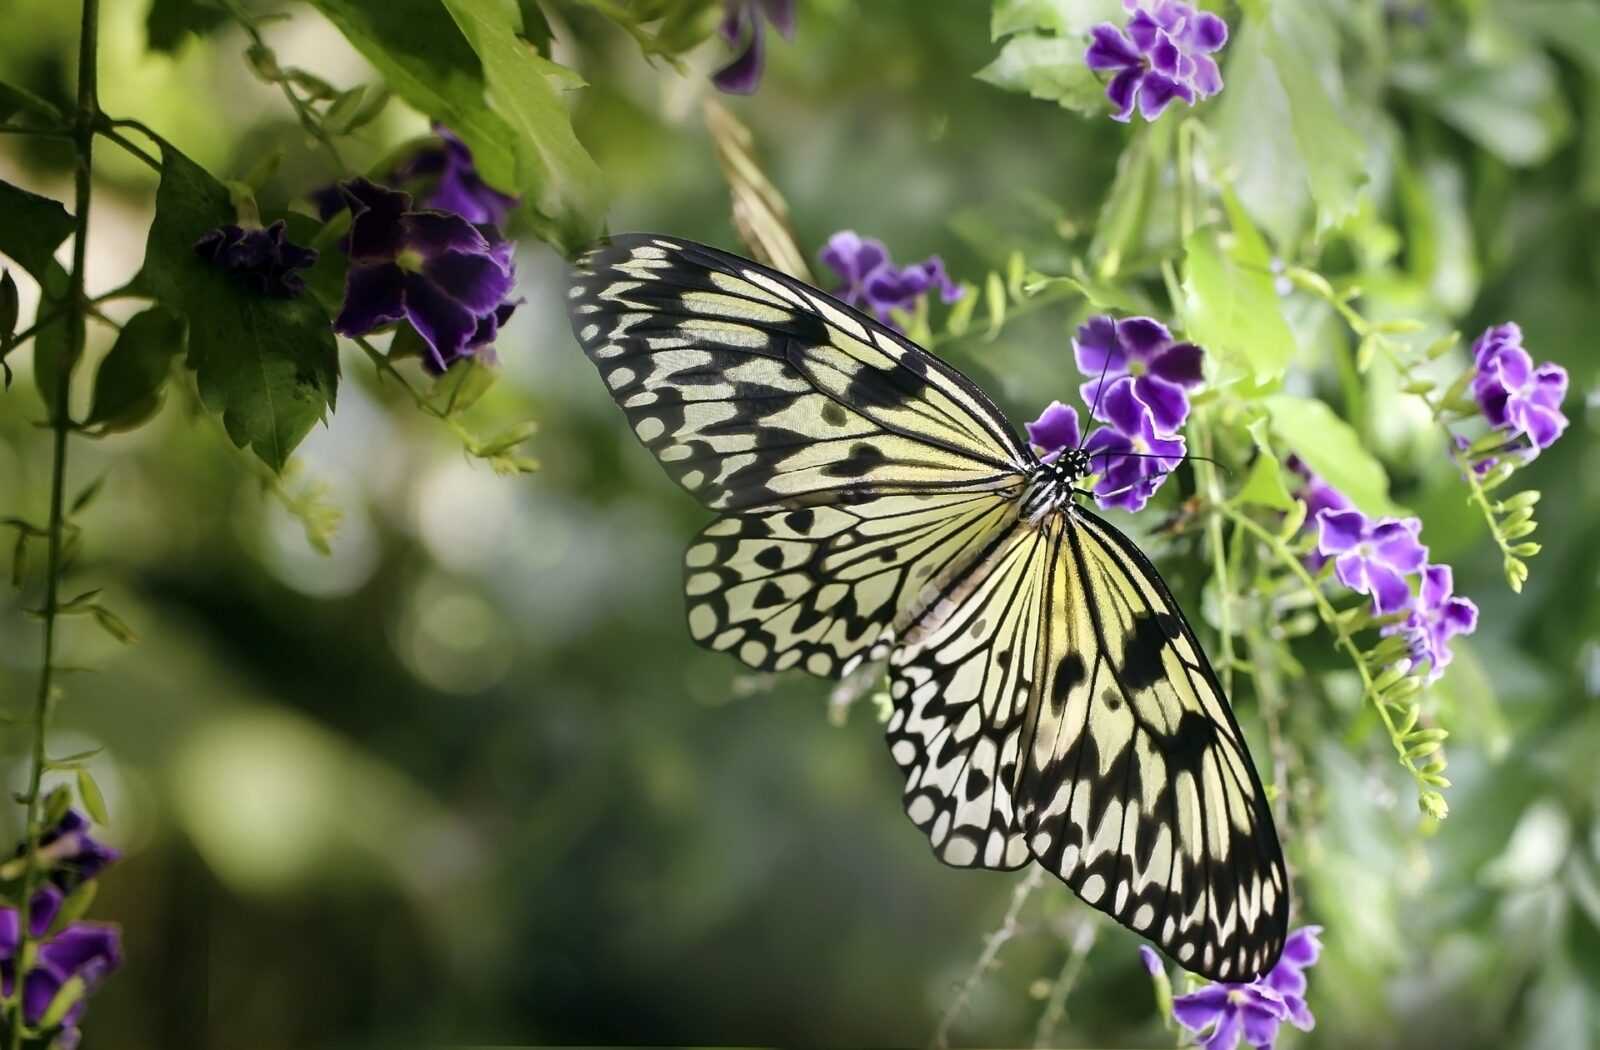
With its glorious sprays of deep purple flowers that dangle in graceful sprays, Duranta erecta brings vivid tropical color to any Gulf Coast area garden. Native to the tropical regions of the Americas, the most used Duranta erecta common name is Golden Dewdrop, though some call it Pigeon Berry. It boasts vibrant color and an elegant weeping shape, blooming profusely and attracting bees and butterflies.

Duranta erecta is a multi-stemmed shrub that can reach a height of 6 to 15 feet with a spread of 6 to 10 feet. It features an upright and bushy growth habit, adorned with glossy green foliage and clusters of vibrant flowers.

The foliage of the Duranta erecta plant consists of small, elliptical leaves arranged in an opposite or whorled pattern along the stems. The leaves have a lustrous green color and provide an attractive backdrop to the blossoms. The plant is evergreen in subtropical and tropical climates.

One of the highlights of Duranta is its showy flowers. The pendulous flower clusters, known as racemes, dangle from the branches and are adorned with tubular blossoms. The flowers come in various colors, including shades of purple, blue, white, or a combination of these hues, creating a striking visual display.

Duranta Origins

Duranta erecta plant
Mokkie, CC BY-SA 3.0, via Wikimedia Commons

Duranta erecta originates from the Caribbean, Mexico, and South America, where it thrives in warm and tropical climates. It has since become naturalized in many parts of the world, including the Gulf Coast region of the United States.

In its native habitat, you’ll find Duranta growing in open woodlands, thickets, and disturbed areas. It is well-adapted to tropical and subtropical environments, showcasing its resilience and versatility.

Duranta is generally suitable for growing in USDA hardiness zones 9 to 11. Growing Duranta in Florida provides a particularly favorable climate for the successful cultivation of this tropical beauty. It also thrives along the Gulf Coast in Texas and Louisiana.

Optimal Growing Conditions

Duranta erecta thrives in full sun to partial shade, making it adaptable to different light conditions. It prefers well-draining soil with moderate moisture retention. Once established, it can tolerate periods of drought.

Golden Dewdrop Duranta erecta delivers a prolonged flowering season, typically spanning from spring to late fall. During this time, the plant produces an abundance of blossoms, drawing in squadrons of delighted bees.

Duranta berries are small, spherical fruits that develop after the flowering period. They are a vibrant golden or yellow color, hence the common name for Duranta: “Golden Dewdrop.”

These berries, typically about 1/2 inch in diameter, add ornamental value to the plant and contribute to its overall visual appeal. However, it is important to note that the berries are considered toxic if ingested, especially to children and pets, so precautions should be taken to prevent accidental ingestion.

Wildlife Benefits of Golden Dewdrop Duranta Erecta

Duranta butterfly

Duranta erecta serves as a valuable host plant for butterfly species such as the Gulf Fritillary (Agraulis vanillae) and the White Peacock (Anartia jatrophae). These butterflies lay their eggs on the leaves, and the resulting larvae, or caterpillars, feed on the foliage.

Duranta Erecta Care

Care of your Golden Dewdrop plant is relatively straightforward when grown under the right conditions.

Light Requirements

Duranta erecta thrives in full sun to partial shade. It prefers a minimum of 6 hours of direct sunlight per day for optimal growth and flowering. In areas with intense afternoon sun, providing partial shade during the hottest part of the day can help prevent stress and sunburn.

Soil Type

Duranta prefers well-draining soil that retains some moisture without becoming waterlogged. It adapts well to various soil types, including loam, sandy, or clay soils.

Soil pH

The ideal soil pH for Duranta ranges between slightly acidic to slightly alkaline, around 6.0 to 7.5. Conduct a soil test to determine the pH level and amend the soil if necessary to maintain the desired range.

Climate Requirements

Golden Dewdrop is well-suited to tropical and subtropical climates. It thrives in areas with warm temperatures, moderate humidity, and mild winters.

Temperature Tolerances

The optimal temperature range for Duranta is between 65°F and 85°F, providing the ideal conditions for growth and flowering.

Duranta growth may slow or temporarily stop when temperatures drop below 50°F.

Prolonged exposure to temperatures below 32°F can cause damage and the plant may experience leaf drop, browning, or dieback of branches.

In extremely hot conditions above 95°F, Golden Dewdrop may experience heat stress, resulting in wilting, leaf burn, or reduced overall vigor. Providing shade or adequate watering can help mitigate the effects of high temperatures.

Protecting Duranta from Cold

When temperatures drop below freezing, protect Duranta from cold damage:

  • Water well and deeply during the warmth of the day.
  • Apply a layer of organic mulch around the base of the plant to insulate the roots and retain soil moisture.
  • Cover the plant with a frost cloth or blanket during freezing temperatures to protect it from frost damage.

Elevation Concerns

Duranta is adaptable to various elevations within its suitable hardiness zones. However, keep in mind that colder temperatures at higher elevations may require additional protection during winter months.

Planting Duranta for Successful Establishment

Duranta
Dinkum, CC0, via Wikimedia Commons

Considering your landscape carefully before planting your Duranta. Remember, it will grow to a large size if not regularly pruned.

Choosing a Location

Select a site that receives full sun to partial shade, ensuring at least 6 hours of direct sunlight per day.

Consider the plant’s mature size and provide enough space for it to grow without overcrowding nearby plants or structures.

Ensure the planting location has well-draining soil to prevent waterlogging.

Step-by-Step Instructions for Planting a Duranta erecta Plant:

Dig a hole: Dig a hole that is twice the width and slightly deeper than the root ball of the Duranta erecta plant.

Prepare the soil

If the soil is heavy clay or lacks organic matter, mix in compost or well-rotted manure to improve drainage and fertility.

Remove the plant from its container

Gently tap or squeeze the container to loosen the root ball, then carefully slide the plant out.

Position the plant

Place the plant in the center of the hole, ensuring that the top of the root ball is level with or slightly above the soil surface.

Backfill the hole

Fill the hole with the amended soil, gently firming it around the root ball to eliminate air pockets.

Water thoroughly

Give the newly planted Duranta erecta a deep watering to settle the soil and establish good root-to-soil contact.

Aftercare

Provide regular watering, keeping the soil consistently moist but not waterlogged, especially during the first few months after planting.

Apply a layer of organic mulch around the base of the plant, keeping it a few inches away from the stem. Mulch helps conserve soil moisture and suppress weeds.

Watering Schedule

Duranta can be a thirsty plant, so consider the weather and temperature when deciding how frequently to water your plant.

  • Spring: Water thoroughly and regularly as new growth emerges.
  • Summer: Increase watering during hot and dry periods to ensure adequate soil moisture.
  • Fall: Maintain regular watering as the plant prepares for winter.
  • Winter: Reduce watering, allowing the soil to dry out slightly between waterings.

Optimal Duranta Fertilizer Composition and Schedule

To make the most of your fertilizer dollars, make sure you feed your Golden Dewdrop appropriately throughout the year.

Leafing Out (Spring)

Use a balanced slow-release fertilizer, such as a 10-10-10 or 14-14-14. Apply according to the package instructions, typically in early spring when new growth begins. Follow recommended rates based on the size and age of the plant.

Blossom (Summer)

Switch to a fertilizer higher in phosphorus, such as a 10-20-10 or 15-30-15. Apply as directed on the package during the active blooming period to support flower production and quality.

Pre-Winter/Over Winter

Avoid fertilizing during late fall and winter when the plant enters a period of dormancy. Instead, focus on providing adequate moisture and protecting the plant from cold temperatures.

Placing a thick layer of compost or other organic matter under the mulch to break down over winter will provide better growing conditions in spring.

Note: It is crucial to follow the specific instructions provided by the fertilizer manufacturer and adjust the amounts based on the plant’s needs and growing conditions.

Duranta erecta alba
Forest & Kim Starr, CC BY 3.0 US, via Wikimedia Commons

Common Duranta Pests

There are a few pests that might make a meal of your Golden Dewdrop. Remember that you don’t have to remove them if you choose not to. Many of these pests provide food for wildlife, so you may want to refrain from treatment unless they threaten the life of your plant.

Aphids

These small, soft-bodied insects cluster on new growth, sucking sap from the plant. Use a strong jet of water to dislodge them and let ladybugs feast on the rest.

It’s also a good idea to look for ants if you see an aphid infestation. Ants will protect aphids from predators in order to farm them for their “dew.”. An ant trap with boric acid will reduce the number of ants and aphids in an environmentally friendly way.

Whiteflies

These tiny, white insects congregate on the undersides of leaves, causing yellowing and stunted growth. Remedy: Use insecticidal soap, neem oil, or introduce natural predators like ladybugs or lacewings.

Caterpillars

Various caterpillar species, such as the caterpillars of the Gulf Fritillary butterfly, can feed on the leaves. We recommend handpicking them, but only if they seem to be a real threat to your Duranta erecta plant.

Note that Oleander moth caterpillars may also infest your Duranta plant and become devastating. Unfortunately, it is easy to confuse them with Gulf Fritillary caterpillars.

Spider Mites

These tiny pests cause yellow stippling on leaves and produce fine webbing. Spray the foliage with a strong jet of water to dislodge them or apply insecticidal soap or horticultural oil. Spider mites usually appear only on dry and desiccated plants, so spray the plant frequently and water more regularly.

Golden Dewdrop Common Diseases

Leaf Spot: Fungal leaf spot diseases can cause dark spots or patches on the leaves. Prune infected branches to improve air circulation around the plant. Fungicidal sprays may be necessary for severe infections. Copper sprays are generally considered safe and affordable and most are listed for organic gardening.

Powdery Mildew

This fungal disease forms a white, powdery coating on the leaves, stems, and flowers. Prune to Improve air circulation, avoid overhead watering, and apply fungicidal sprays as needed.

A solution of 8-12 tablespoons of household hydrogen peroxide (3%) in 1 gallon of water sprayed every three days for a week will reduce powdery mildew with diligent application.

Root Rot

Overwatering or poorly drained soil can lead to root rot, causing yellowing leaves, wilting, and eventual plant decline. Remedy: Ensure proper drainage and adjust watering practices. If unable to remediate the soil quality, you may need to move the plant to a location with better drainage.

Duranta Eerecta Propagation

Although it may take several tries and some time to propagate Duranta from cuttings, it’s well worth your effort.

  1. Select a stem cutting: Choose a healthy, non-flowering stem measuring about 4 to 6 inches (10 to 15 cm) in length.
  2. Prepare the cutting: Use clean, sharp pruning shears to make a clean cut just below a leaf node.
  3. Remove lower leaves: Remove the lower leaves, leaving a few leaves at the top of the cutting.
  4. Apply rooting hormone (optional): Dip the cut end of the cutting into a rooting hormone powder or gel to enhance root formation.
  5. Plant the cutting: Insert the cut end of the stem into a well-draining potting mix or a mix of peat moss and perlite, ensuring at least one node is below the soil surface. I use a 50/50 mix of coco coir and perlite that provides both moisture retention and excellent drainage.
  6. Provide optimal conditions: Place the potted cutting in a warm, bright location with indirect sunlight. Maintain a consistently moist but not waterlogged soil.
  7. Rooting process: Keep the soil moist and provide high humidity by covering the cutting with a plastic bag or using a propagation tray with a clear lid. Roots should develop in a few weeks to a few months.
  8. Transplanting: Once the roots have developed, carefully transplant the rooted cutting into a larger pot or desired planting location.

Landscaping with Duranta

Duranta erecta wildlife butterfly
Adam Jones Adam63, CC BY-SA 3.0, via Wikimedia Commons

Golden Dewdrop’s striking appearance and adaptability make it a valuable addition to various landscaping designs.

One of the benefits is that you can prune Duranta erecta into a tree shape. You can also create a Duranta erecta hedge with a row of specimens.

Here are some other creative ideas to incorporate this versatile plant into your landscape:

Colorful Hedges and Borders

Use Duranta erecta as a hedge or border plant to create a vibrant living fence. Its dense foliage and colorful flowers add visual interest and define spaces. Consider planting them in a row along a pathway or around garden beds for a lively and eye-catching border. Prune regularly to ensure bushy growth and increase the density of the hedge.

Focal Point in Mixed Borders

Plant Duranta as a focal point within mixed borders or perennial beds. Its tall stature and profusion of blooms draw the eye and provide a stunning centerpiece. Combine it with other flowering plants that complement its colors, such as salvias, lantanas, or petunias.

Container Gardening

Duranta is well-suited for container gardening. Place potted specimens on patios, balconies, or porches to add a tropical touch to your outdoor living spaces. Choose large containers to accommodate the plant’s mature size and pair it with cascading or trailing plants for added texture and visual interest.

Poolside Landscaping

The lush foliage and attractive flowers of Duranta erecta make it an excellent choice for poolside landscaping. Plant it as a backdrop to create a tropical oasis around your pool area. The reflection of the blooms on the water’s surface adds a touch of tranquility.

Butterfly and Pollinator Gardens

Duranta’s nectar-rich flowers attract butterflies, bees, and other pollinators. Create a dedicated butterfly or pollinator garden by incorporating Golden Dewdrop along with other butterfly-friendly plants, such as milkweed, butterfly bush, and zinnias. This will not only enhance the visual appeal but also contribute to the local ecosystem.

Landscape Ornamentals that Pair Well with Duranta

When choosing companion plants for Duranta, consider those with similar soil, light exposure, water, and fertilization requirements. Here are a few examples:

Native Lantana (Lantana depressa)

These colorful flowering perennials share similar growth habits and requirements with Duranta. Their vibrant yellow blooms complement the deep purple of Duranta and attract pollinators.

Pentas (Pentas lanceolata)

With their long-lasting clusters of star-shaped flowers, Pentas create a beautiful contrast when planted alongside Golden Dewdrop. They thrive in similar conditions and provide additional pops of color.

Tropical Sage (Salvia coccinea)

The upright, red flower spikes of Tropical Sage create an excellent complement to Duranta’s vivid purple blooms.

Plumbago (Plumbago auriculata)

The delicate blue flowers of Plumbago complement the colors of Golden Dewdrop and both plants thrive in similar conditions.

Cape Honeysuckle (Tecomaria capensis)

This evergreen shrub displays clusters of vibrant orange or red tubular flowers, creating a stunning contrast when planted alongside Duranta.

Firebush (Hamelia patens)

With its fiery red-orange tubular flowers, Firebush adds a splash of color and attracts hummingbirds, making it an excellent companion plant.

Society Garlic (Tulbaghia violacea)

This perennial herb features attractive gray-green foliage and clusters of purple flowers. It pairs well with Duranta erecta and adds a delightful fragrance to the garden.

Mexican Flame Vine (Senecio confusus)

Known for its bright orange blooms, Mexican Flame Vine creates a beautiful backdrop when combined with Duranta.

Coral Honeysuckle (Lonicera sempervirens)

This native Florida vining plant that produces attractive red-orange tubular flowers, which can create a beautiful contrast when planted near Duranta colorful blooms. Additionally, Coral Honeysuckle is known to attract hummingbirds, further enhancing your garden’s appeal to wildlife.

These plant selections will provide a diverse landscape, attracting pollinators, beneficials, and other wildlife to your subtropical garden.

Vivid Gulf Coast Garden Color

Duranta erecta, with its vibrant purple flowers, bright golden berries, and attractive foliage offers numerous opportunities for tropical landscaping designs. Planted with native Gulf Coast region flowering perennials and other wildflowers, your garden will soon be bursting with life, movement, and color.

FAQ – Frequently Asked Questions About Growing Duranta

Can Duranta take full sun?

Yes, Duranta erecta thrives in full sun but can also tolerate partial shade.

Is a Duranta a perennial?

Yes, Duranta erecta is a perennial shrub.

Will Duranta survive a freeze?

Duranta is sensitive to freezing temperatures and may experience damage or die back in severe freezes.

Does Duranta erecta like sun or shade?

Duranta prefers full sun to partial shade.

How cold can Duranta tolerate?

Duranta can tolerate temperatures down to around 25°F (-4°C), but extended cold periods can cause damage or even kill the plant.

Do hummingbirds like Duranta?

Yes, hummingbirds are attracted to the vibrant flowers of Duranta erecta.

What hardiness zone is Duranta erecta?

Duranta erecta is typically suitable for USDA hardiness zones 9 to 11.

Should I deadhead Duranta?

Deadheading spent flowers can encourage continued blooming and maintain a neat appearance, but it is not necessary. You may want to trim off and dispose of the berries if you have concerns about their toxicity.

How big does Duranta get?

Duranta erecta can grow to a height of 6 to 15 feet (1.8 to 4.6 meters) with a spread of 6 to 10 feet (1.8 to 3 meters).

Does Duranta bloom all summer?

Duranta erecta has a prolonged flowering season, typically blooming from spring to fall, but the intensity and duration of flowering can vary.

Is a Duranta a tree or a bush?

Duranta erecta is typically grown as a bushy shrub, but it can be trained into a small duranta erecta tree form with proper pruning.

How do you take care of Duranta in the winter?

In winter, protect Duranta erecta from frost by covering it with a frost cloth or blanket and applying a layer of organic mulch around the base to insulate the roots.

Does Duranta attract bees?

Duranta erecta does attract bees and butterflies with its nectar-rich flowers.

What is the common name for Duranta?

Duranta erecta is commonly known as Golden Dewdrop or Pigeon Berry.

Does Duranta erecta have medicinal uses?

While Duranta erecta has some traditional medicinal uses, it is primarily cultivated as an ornamental plant. In certain cultures, various parts of Duranta erecta, such as the leaves and roots, have been used in traditional medicine to treat conditions like fever, cough, respiratory ailments, and skin infections.

What is Duranta erecta aurea?

Duranta erecta aurea is a cultivar of Duranta erecta with golden or yellow foliage.

What is Duranta erecta alba?

Duranta erecta alba is a cultivar of Duranta erecta with white flowers.

Where can I purchase Duranta erecta?

We frequently carry Duranta in our nursery. You can check out our Etsy shop for the current inventory.

Posted on 1 Comment

Gulf Coast Gardening: Growing Plumbago for Tropical Beauty

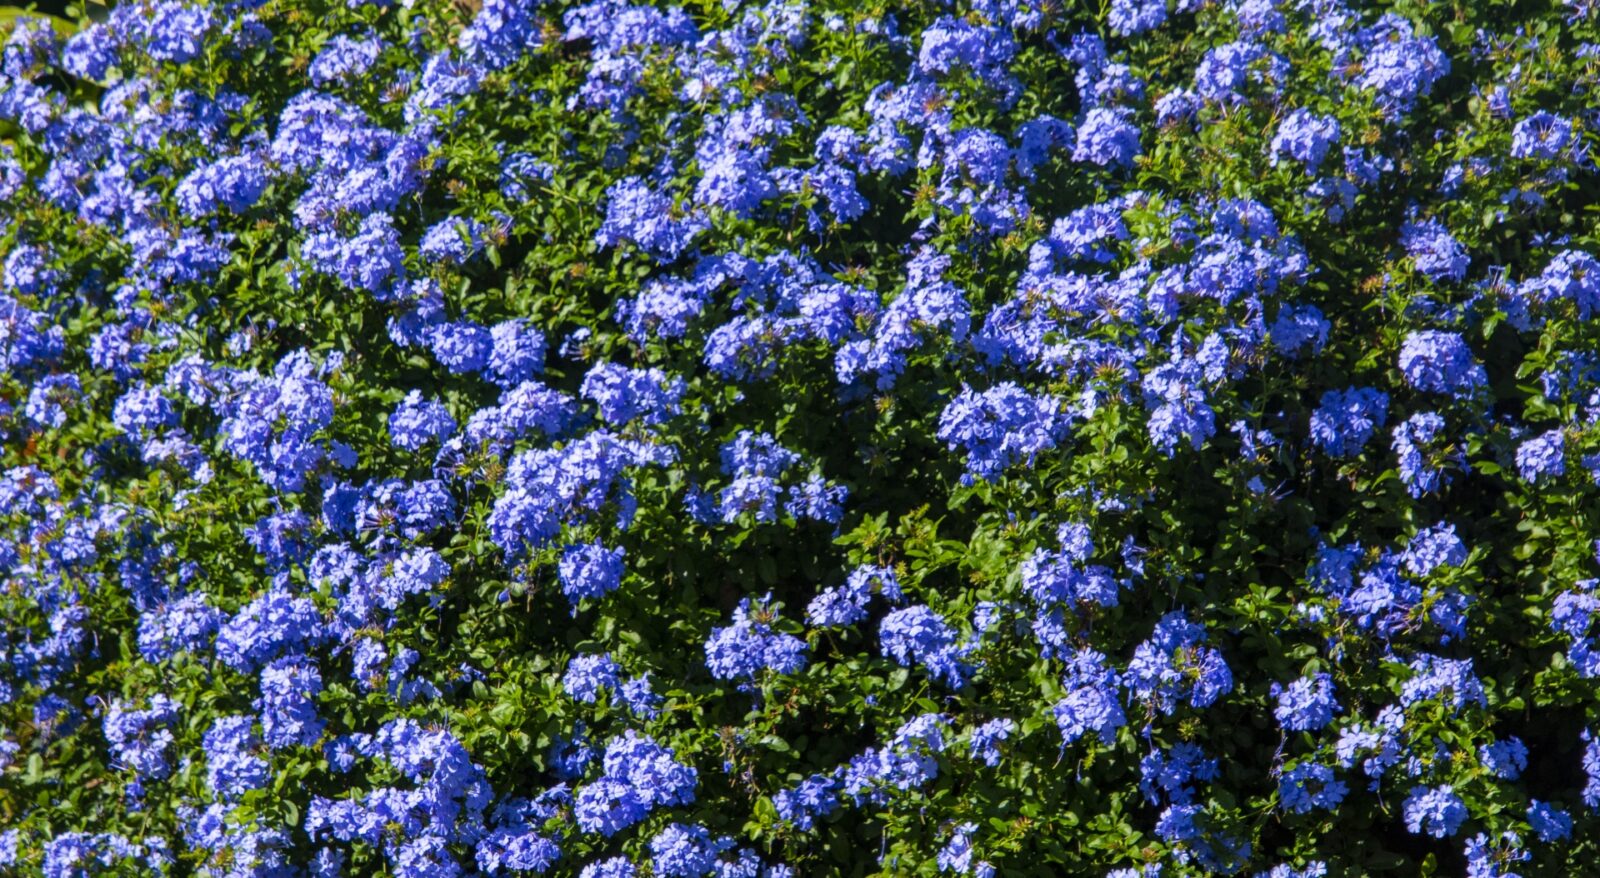
Plumbago, a genus comprising several species of flowering plants, has captured the hearts of gardeners and horticulturists around the world with its dazzling beauty and ability to thrive in tropical and subtropical climates.

Gulf Coast gardeners may find three species available within the Plumbago genus, each possessing its own unique characteristics and charm.

Plumbago auriculata

Plumbago auriculata, Cape Plumbago
Vengolis, CC BY-SA 4.0, via Wikimedia Commons

Originating from South Africa, Plumbago auriculata, commonly known as Cape leadwort, Cape Plumbago, or blue plumbago, thrives in the Gulf Coast region of the United States. This is the species you will most likely encounter in commercial nurseries. It is most often a light to bright blue, but you can also find a white variety of the flower.

In its native habitat, this evergreen shrub thrives in a variety of environments, from rocky slopes to coastal dunes.

It’s a versatile and visually striking plant. It typically grows into a dense, rounded shrub, reaching an average height of 6 to 10 feet with a spread of 6 to 8 feet. Its glossy, deep green leaves are elongated and lance-shaped, creating an elegant backdrop for the plant’s vibrant blue flowers.

Blue Plumbago is known for its proliferation of flowers. Throughout the warm months, usually from late spring to fall, even into winter in zones 10 and 11, the plant offers multiple clusters of tubular flowers in hues ranging from white to pale sky blue to deep cobalt blue. The delicate blossoms, about 1 inch in diameter, have a very subtle fragrance and attract various pollinators, including bees and butterflies.

When it comes to hardiness zones, it thrives in zones 8 to 11 within the U.S., making it a suitable choice for gardeners along the Gulf Coast and other mild-winter regions. However, in colder areas, it can be grown in containers and brought indoors during the winter months.

Cape Plumbago with white flowers
No machine-readable author provided. Calvin Teo assumed (based on copyright claims)., CC BY-SA 2.5, via Wikimedia Commons

Species care details

To achieve optimal growth and bloom, provide Plumbago auriculata with full sun to partial shade. This species is adaptable to a wide range of soil types, but it prefers well-draining soil enriched with organic matter. Regular watering is necessary, especially during drier periods, to maintain healthy growth.

This is one of the most reliable landscape ornamentals in my garden, and I find that it’s very fussy (hungry and thirsty) for the first three years but after that, it flourishes with very little care.

The plant’s nectar-rich flowers serve as a valuable food source for pollinators, while its foliage offers shelter for various insects and small animals. I frequently find Florida anoles napping in the branches.

Several butterfly species, such as the Zebra Blue (Leptotes plinius) and the Common Blue (Polyommatus icarus), utilize this species as a host plant for their larvae.

Plumbago indica (or Plumbago rosea):

Plumbago indica, Plumbago rosea, Red Plumbago
Wiethase, CC BY-SA 3.0, via Wikimedia Commons

Plumbago indica (or Plumbago rosea), commonly known as Indianleadwort or red plumbago (or pink plumbago), is from India, so does wonderfully along the Gulf Coast in our hot, humid climate.

In its natural habitat, it thrives in the tropical and subtropical regions of Asia, including India and Sri Lanka. This species has adapted to a variety of environments, from open woodlands to rocky hillsides and coastal areas.

The plant itself presents a graceful and compact form, growing up to 3 to 6 feet in height and spreading 3 to 4 feet wide. Its slender branches bear lush, dark green leaves that create an attractive backdrop for the blossoms to come.

When it comes to flowering, this species offers a stunning display of vibrant red or pink clusters. These tubular flowers, measuring about 1 inch in diameter, emerge in abundance throughout the warm months, from spring to fall. The delicate blooms emit a gentle fragrance, attracting butterflies and hummingbirds to the garden.

Red plumbago flowers
Vengolis, CC BY 4.0, via Wikimedia Commons

Species care details

In terms of hardiness zones, Plumbago indica thrives in zones 9 to 11 within the U.S. It appreciates full sun to partial shade and prefers well-draining soil that is rich in organic matter. Regular watering is essential for optimal growth and flowering, particularly during dry periods.

The flowering season coincides with the warmer months, providing a refreshing burst of color to gardens and landscapes. Its abundant flowers and compact growth habit make it an excellent choice for borders, hedges, or container gardening.

Plumbago zeylanica

Plumbago zeylanica, Wild Plumbago, Florida Native Plumbago
Bob Peterson from North Palm Beach, Florida, Planet Earth!, CC BY-SA 2.0, via Wikimedia Commons

Hailing from tropical regions of Asia, but also native to coastal regions of Florida, Plumbago zeylanica, also known as Ceylon leadwort or wild plumbago, possesses a natural allure. This herbaceous perennial has made its mark in various ecosystems and now finds itself cherished by gardeners in the Gulf Coast region and beyond.

Wild Plumbago is not as showy as the other two species we’ve discussed, but it has the benefit of being a Florida native plant, supporting our unique ecosystems.

It thrives in diverse habitats, including grasslands, open forests, and scrublands. Its adaptability allows it to flourish in a range of soil types, from sandy to clayey compositions.

The plant itself displays a unique growth habit, forming clumps of sprawling, vine-like stems that reach a height of 1 to 3 feet. Its lance-shaped leaves, arranged alternately along the stems, add an attractive touch of green to the landscape.

Plumbago zeylanica showcases clusters of pale blue or white blossoms. These tubular flowers, about 0.5 inch in diameter, bloom throughout the warm months, from spring to fall. The delicate flowers emit a faint, sweet fragrance that entices pollinators, including bees and butterflies.

Native Florida plumbago
Forest & Kim Starr, CC BY 3.0, via Wikimedia Commons

Species care details

This species typically grows in zones 9 to 11 within the U.S., where it thrives in the warm and humid conditions of the Gulf Coast region. It prefers full sun to partial shade and well-draining soil enriched with organic matter. Regular watering is necessary to maintain its lush foliage and promote healthy growth.

The flowering season coincides with the warmer months, providing a delightful display of pale blue or white flowers. Its sprawling growth habit makes it an excellent choice for ground cover, cascading over walls, or spilling out of containers.

Plumbago zeylanica attracts various pollinators, contributing to the local ecosystem. While specific wildlife interactions may vary, Wild Plumbago is known to support the life cycles of several butterfly species.

Planting Plumbago: Creating a Beautiful Foundation

Blue Plumbago
Ввласенко, CC BY-SA 3.0, via Wikimedia Commons

Plumbago brings a touch of tropical splendor to any Gulf Coast garden with its abundant flowers and ease of care. Plumbago is what they call “a doer” in the garden. It delivers nearly year-round and once established, it sets the foundation for a lush tropical landscape.

Choosing a Location to Plant Plumbago:

Selecting the right location for planting is crucial to its growth and overall health. Consider the following factors when choosing a spot:

Sunlight

This species thrives in full sun to partial shade. Choose a location that receives at least 6 hours of direct sunlight per day for optimal growth and flowering.

Soil Drainage

Plumbago prefers well-draining soil to prevent waterlogging, which can lead to root rot. Ensure the chosen location has soil that allows water to drain freely.

Space

Consider the mature size of the species you are planting. Allow enough space for the plant to spread and grow without overcrowding other nearby plants.

Step-by-Step Instructions for Planting a Plumbago Plant

Once you have chosen the ideal location, follow these steps to plant Plumbago:

Prepare the soil:

Dig a hole that is wider and slightly deeper than the root ball of the plant.

Loosen the soil in the hole to allow for easy root penetration.

Preparing the plant:

If the plant is in a container, gently remove it by tapping the sides of the container or squeezing the base. Avoid pulling the plant out forcefully to prevent root damage.

If the plant is root-bound, tease out the roots gently to encourage outward growth.

Planting the Plumbago:

Place the plant in the center of the hole, ensuring that the top of the root ball is level with or slightly above the surrounding soil.

Backfill the hole with soil, gently pressing it down to eliminate air pockets.

Water the plant thoroughly to settle the soil around the roots.

Mulching:

Apply a layer of organic mulch, such as wood chips or bark, around the base of the plant. This helps retain moisture, suppresses weeds, and insulates the roots.

Caring for Plumbago: Nurturing the Tropical Beauty

Plumbago, with its vibrant blooms and lush foliage, requires proper care to thrive and reach its full potential. Let’s delve into the details and discover how to care for these tropical beauties.

Light Requirements

It thrives in full sun to partial shade. It benefits from at least 6 hours of direct sunlight each day to promote healthy growth and abundant flowering.

Soil Conditions

Plumbago prefers well-draining soil that retains some moisture but does not become waterlogged. A loamy or sandy soil enriched with organic matter provides an ideal growing medium.

Soil pH:

Plumbago tolerates a wide range of soil pH levels, from slightly acidic to slightly alkaline. A pH range of 6.0 to 7.5 is generally suitable for optimal growth.

Climate Preferences

This plant is well-suited for tropical and subtropical climates. It thrives in warm and humid conditions, making it an excellent choice for the Gulf Coast region and similar regions.

Temperature Tolerances

Despite its tropical origins, plumbago is surprisingly hardy.

Optimal Temperature

It thrives in temperatures ranging from 70°F to 90°F (21°C to 32°C).

Temperature Limit for Growth

It may slow down its growth when temperatures drop below 50°F (10°C).

Temperature Causing Damage

Plumbago can suffer damage when exposed to temperatures below 32°F (0°C). Frost or freezing conditions can cause wilting, browning, and leaf drop.

Effects of High Temperatures

It can tolerate high temperatures, but extreme heat, especially when combined with prolonged drought, can lead to stress, wilting, and reduced flowering.

Protection from Cold

In regions with colder winters, provide protection for your plant during freezing temperatures. Mulch around the base of the plant to insulate the roots, and cover the plant with a frost cloth or blanket. If grown in containers, move them to a protected area or indoors during winter.

Elevation Concerns

Plumbago does not have specific elevation concerns and can be grown successfully at various elevations.

Watering Schedule

Water Plumbago regularly to keep the soil evenly moist but not waterlogged. Adjust the watering schedule based on weather conditions and rainfall. A general guideline is to provide deep watering once or twice a week during the growing season and reduce frequency during cooler months.

Fertilization

Adjust your plumbago’s feeding schedule to the season.

Leafing Out

In early spring when new growth appears, apply a balanced slow-release fertilizer according to the manufacturer’s instructions.

Blossoming

As the plant prepares to bloom, switch to a fertilizer higher in phosphorus to promote flower production. Follow the product recommendations for application rates.

Pre-Winter or Over Winter

In late summer or early fall, apply a balanced fertilizer to support root development and overall plant health before winter dormancy.

Pruning Schedule

Prune in late winter or early spring, before new growth emerges. Follow these steps:

  • Remove any dead, damaged, or crossing branches.
  • Prune back about one-third of the plant’s height to promote compactness and encourage new growth.
  • Lightly shape the plant to maintain an appealing form.

Common Pests and Diseases

Plumbago is generally resistant to pests, but it can suffer from disease.

Common Pests

Aphids: Use insecticidal soap or a neem oil-based spray to control aphids. Rinse the plant with water or use a gentle stream to dislodge them.

Whiteflies: Use yellow sticky traps or apply an insecticidal soap or oil spray to manage whiteflies.

Spider mites: Spray the plant with water to remove mites or use an insecticidal soap or horticultural oil for control.

Jack’s Dead Bug is an organic solution that uses a naturally occurring bacteria that has worked well for me for many pest problems.

Common Diseases:

Powdery Mildew: Ensure good air circulation and avoid overhead watering. Apply a fungicide labeled for powdery mildew if necessary.

Leaf Spot: Remove and destroy infected leaves. Maintain proper spacing and avoid overhead watering to reduce leaf spot occurrence.

Root Rot: Ensure proper drainage and avoid overwatering. Treat with a fungicide if root rot is detected.

Special Care Considerations

Plumbago may require regular pruning to maintain a compact shape and encourage abundant flowering.

Regularly monitor moisture levels to prevent overwatering or drought stress.

Apply a layer of organic mulch around the base of the plant to conserve moisture, suppress weeds, and protect the roots.

Provide support, such as a trellis or stakes, if growing a climbing variety of Plumbago.

Propagating Plumbago

Now that you’ve planted your plumbago and it’s growing nicely, you may decide you want more. What’s better than free plants?

Here’s how you do it:

Propagating Plumbago from Cuttings

Taking cuttings and rooting them in a soft, light medium is the easiest way to grow more plumbago from your existing plants.

Select a healthy stem

Choose a non-flowering stem from the parent plant that is free from any diseases or pests.

Prepare the cutting

Using clean, sharp pruning shears, cut a 4-6 inch section of the stem just below a node (where leaves emerge).

Remove lower leaves

Remove the lower leaves from the cutting, leaving only a few leaves at the top.
Hormone application (optional): Dip the cut end of the cutting into a rooting hormone powder or gel, following the product instructions.

Plant the cutting

Insert the cut end of the cutting into a well-draining potting mix, ensuring that at least one node is below the soil surface.

I use a 50/50 mix of coconut coir and perlite, which stays moist without going anaerobic.

Provide optimal conditions

Place the pot in a warm, bright location with indirect sunlight. Maintain a consistently moist but not waterlogged soil.

Rooting process

Over the next few weeks, roots should begin to develop. Monitor the soil moisture and mist the cutting occasionally to maintain humidity.

Transplanting

Once the roots have formed, typically within 6-8 weeks, carefully transplant the rooted cutting into a larger container or desired planting location.

Here’s an excellent video showing the process step by step.

Propagating Plumbago from Air Layering:

Air layering is another technique that many use to grow more plants. For many plants, it’s a more reliable way to ensure rooting.

Select a healthy stem

Choose a healthy, non-flowering stem from the parent plant that is flexible and suitable for air layering.

Make a wound

With a sharp knife or pruner, make a 1-inch (2.5 cm) diagonal cut halfway through the stem, just below a node.

Apply rooting hormone (optional)

Apply a rooting hormone powder or gel to the exposed area of the wound to stimulate root development.

Moss and plastic wrap

Moisten sphagnum moss and wrap it around the wounded area. Enclose the moss with plastic wrap, securing it with twine or a rubber band at the top and bottom.

Alternatively, you may want to try air layering pods or propagation balls to ensure the sphagnum stays moist.

Provide moisture and wait

Keep the moss consistently moist by misting or watering as needed. After a few weeks to several months, roots will develop within the moss.

Check for root development

Once roots have formed and are visible through the plastic wrap, carefully cut below the rooted section of the stem.

Plant the new plant

Remove the plastic wrap and moss, and plant the rooted section in a well-draining potting mix or desired planting location.

Provide post-transplant care

Water the newly planted cutting thoroughly and keep it in a warm, bright location with indirect sunlight. Continue to care for it as you would for an established Plumbago plant.

By following these step-by-step instructions for propagating Plumbago from cuttings and air layering, you can expand your collection and share the beauty of these plants with others.

Landscaping with Plumbago

Use Plumbago as a vibrant hedge or border planting. Incorporate it into mixed shrub beds for pops of color.

Plant it near fences, trellises, or pergolas, and train it to climb for vertical interest.

Utilize containers and place Plumbago on patios, decks, or balconies to create a tropical ambiance.

Complementing Plumbago

Combine Plumbago with other colorful flowering plants in butterfly or hummingbird gardens. Here are some ornamental plants that can thrive alongside Plumbago while creating a harmonious and visually appealing landscape:

Native Lantana (Lantana involucrata and Lantana depressa)

Lantana’s colorful clusters of flowers in various shades, including yellow, orange, and pink, complement Plumbago’s blooms. It is also a pollinator magnet, attracting butterflies and hummingbirds.

Pentas (Pentas lanceolata)

Pentas produces clusters of vibrant star-shaped flowers in colors such as red, pink, and white. It attracts pollinators and adds a burst of color alongside Plumbago.

Mexican Bush Sage (Salvia leucantha)

Mexican Bush Sage features striking velvety purple or white flower spikes that add vertical interest and contrast to Plumbago’s mounding growth habit. It is also a favorite of hummingbirds.

Duranta (Duranta erecta)

Horologium, CC BY-SA 3.0, via Wikimedia Commons

Duranta displays clusters of vibrant blue or purple flowers, adding a complementary color contrast to Plumbago. Its glossy foliage and cascading growth habit make it an excellent choice for borders or hanging baskets.

Dwarf Poinciana (Caesalpinia pulcherrima)

Dwarf Poinciana features striking red, orange, or yellow flowers reminiscent of miniature bird-of-paradise blooms. Its vibrant colors can create a stunning visual impact alongside Plumbago.

Tropical Hibiscus

Tropical hibiscus are easy-care plants that add another layer of exotic beauty to your garden while enjoying similar growing conditions. They come in a range of vivid colors that will harmonize with plumbago into a stunning tropical display.

These plant suggestions share similar requirements with Plumbago, ensuring harmonious growth and care. When combined, they create an alluring landscape with a diverse range of colors, textures, and forms. Always consider the mature size of each plant and their compatibility in terms of growth habits and maintenance to achieve a well-balanced and cohesive garden design.

Reliable Beauty

With its ease of care, consistent and abundant flowering, and evergreen foliage in mild climates, plumbago is a reliable tropical beauty in the Gulf Coast garden. With a little pampering during the first three years of establishment, plumbago is a visually stunning addition to your garden.

Visit our Etsy shop for Blue Plumbago, Duranta, Pentas, and other perennial flowering plants for your butterfly garden.

FAQ – Frequently Asked Questions About Growing Plumbago

Is plumbago easy to grow?

Yes, Plumbago is generally considered an easy-to-grow plant, especially in tropical and subtropical regions, given its tolerance for various soil types, adaptable nature, and relatively low maintenance requirements.

What month does plumbago bloom?

Plumbago typically blooms from late spring to fall, depending on the mildness of your winter.

Do hummingbirds like plumbago?

Yes, hummingbirds are attracted to the tubular flowers of Plumbago and often visit them for nectar, making it a favorite plant for hummingbird enthusiasts.

Which butterflies, months, and other insects like plumbago?

Plumbago attracts various butterflies, including species such as Zebra Blue (Leptotes plinius), Common Blue (Polyommatus icarus), and other pollinators. The specific months of butterfly activity can vary based on the region, but generally, the warmer months from spring to fall are when butterflies are most active around Plumbago. Additionally, bees and other beneficial insects are also attracted to the nectar-rich flowers of Plumbago.

When should you plant plumbago?

Plumbago can be planted in the spring after the last frost date, as it thrives in warm weather. This allows the plant to establish itself and take advantage of the growing season.

Where is the best place to plant plumbago?

The best place to plant Plumbago is in a location that receives full sun to partial shade.

How do you keep plumbago blooming?

To keep Plumbago blooming, provide it with full sun to partial shade, regular watering, well-draining soil, and regular fertilization with a bloom-boosting fertilizer.

When should you prune plumbago?

Plumbago should be pruned in late winter or early spring before new growth emerges. This timing allows for rejuvenation, shaping, and stimulating new growth for the upcoming growing season.

Does plumbago come back every year?

Yes, Plumbago is a perennial plant that typically comes back every year in suitable growing conditions. It is an evergreen in subtropical and tropical climates.

How do you winterize blue plumbago?

To winterize blue Plumbago, provide a layer of organic mulch around the base of the plant to insulate the roots, and cover the plant with a frost cloth or blanket during freezing temperatures.

Should you cut back plumbago?

Yes, it is beneficial to cut back Plumbago in late winter or early spring before new growth emerges. Pruning helps maintain a compact shape, encourages new growth, and stimulates abundant flowering. You can also cut it back during summer if it overgrows its allotted space.

How do you make plumbago bushy?

To make Plumbago bushy, prune it back by about one-third of its height in late winter or early spring before new growth begins. This encourages branching and promotes a more compact, bushy growth habit.

What other ornamental plants pair well with plumbago?

Several ornamental plants pair well with Plumbago to create a visually appealing garden. Some suitable companions include Lantana, Pentas, Mexican Bush Sage, Duranta, Dwarf Poinciana, and other flowering perennials that share similar soil, light, and water requirements.

How big does plumbago get?

Plumbago can reach an average height of 6 to 10 feet (1.8 to 3 meters) and have a spread of 6 to 8 feet (1.8 to 2.4 meters), depending on the specific species and growing conditions.

Posted on

What Every Southern Gardener Needs to Know About Tropical Hibiscus

tropical hibiscus care for Florida gardens

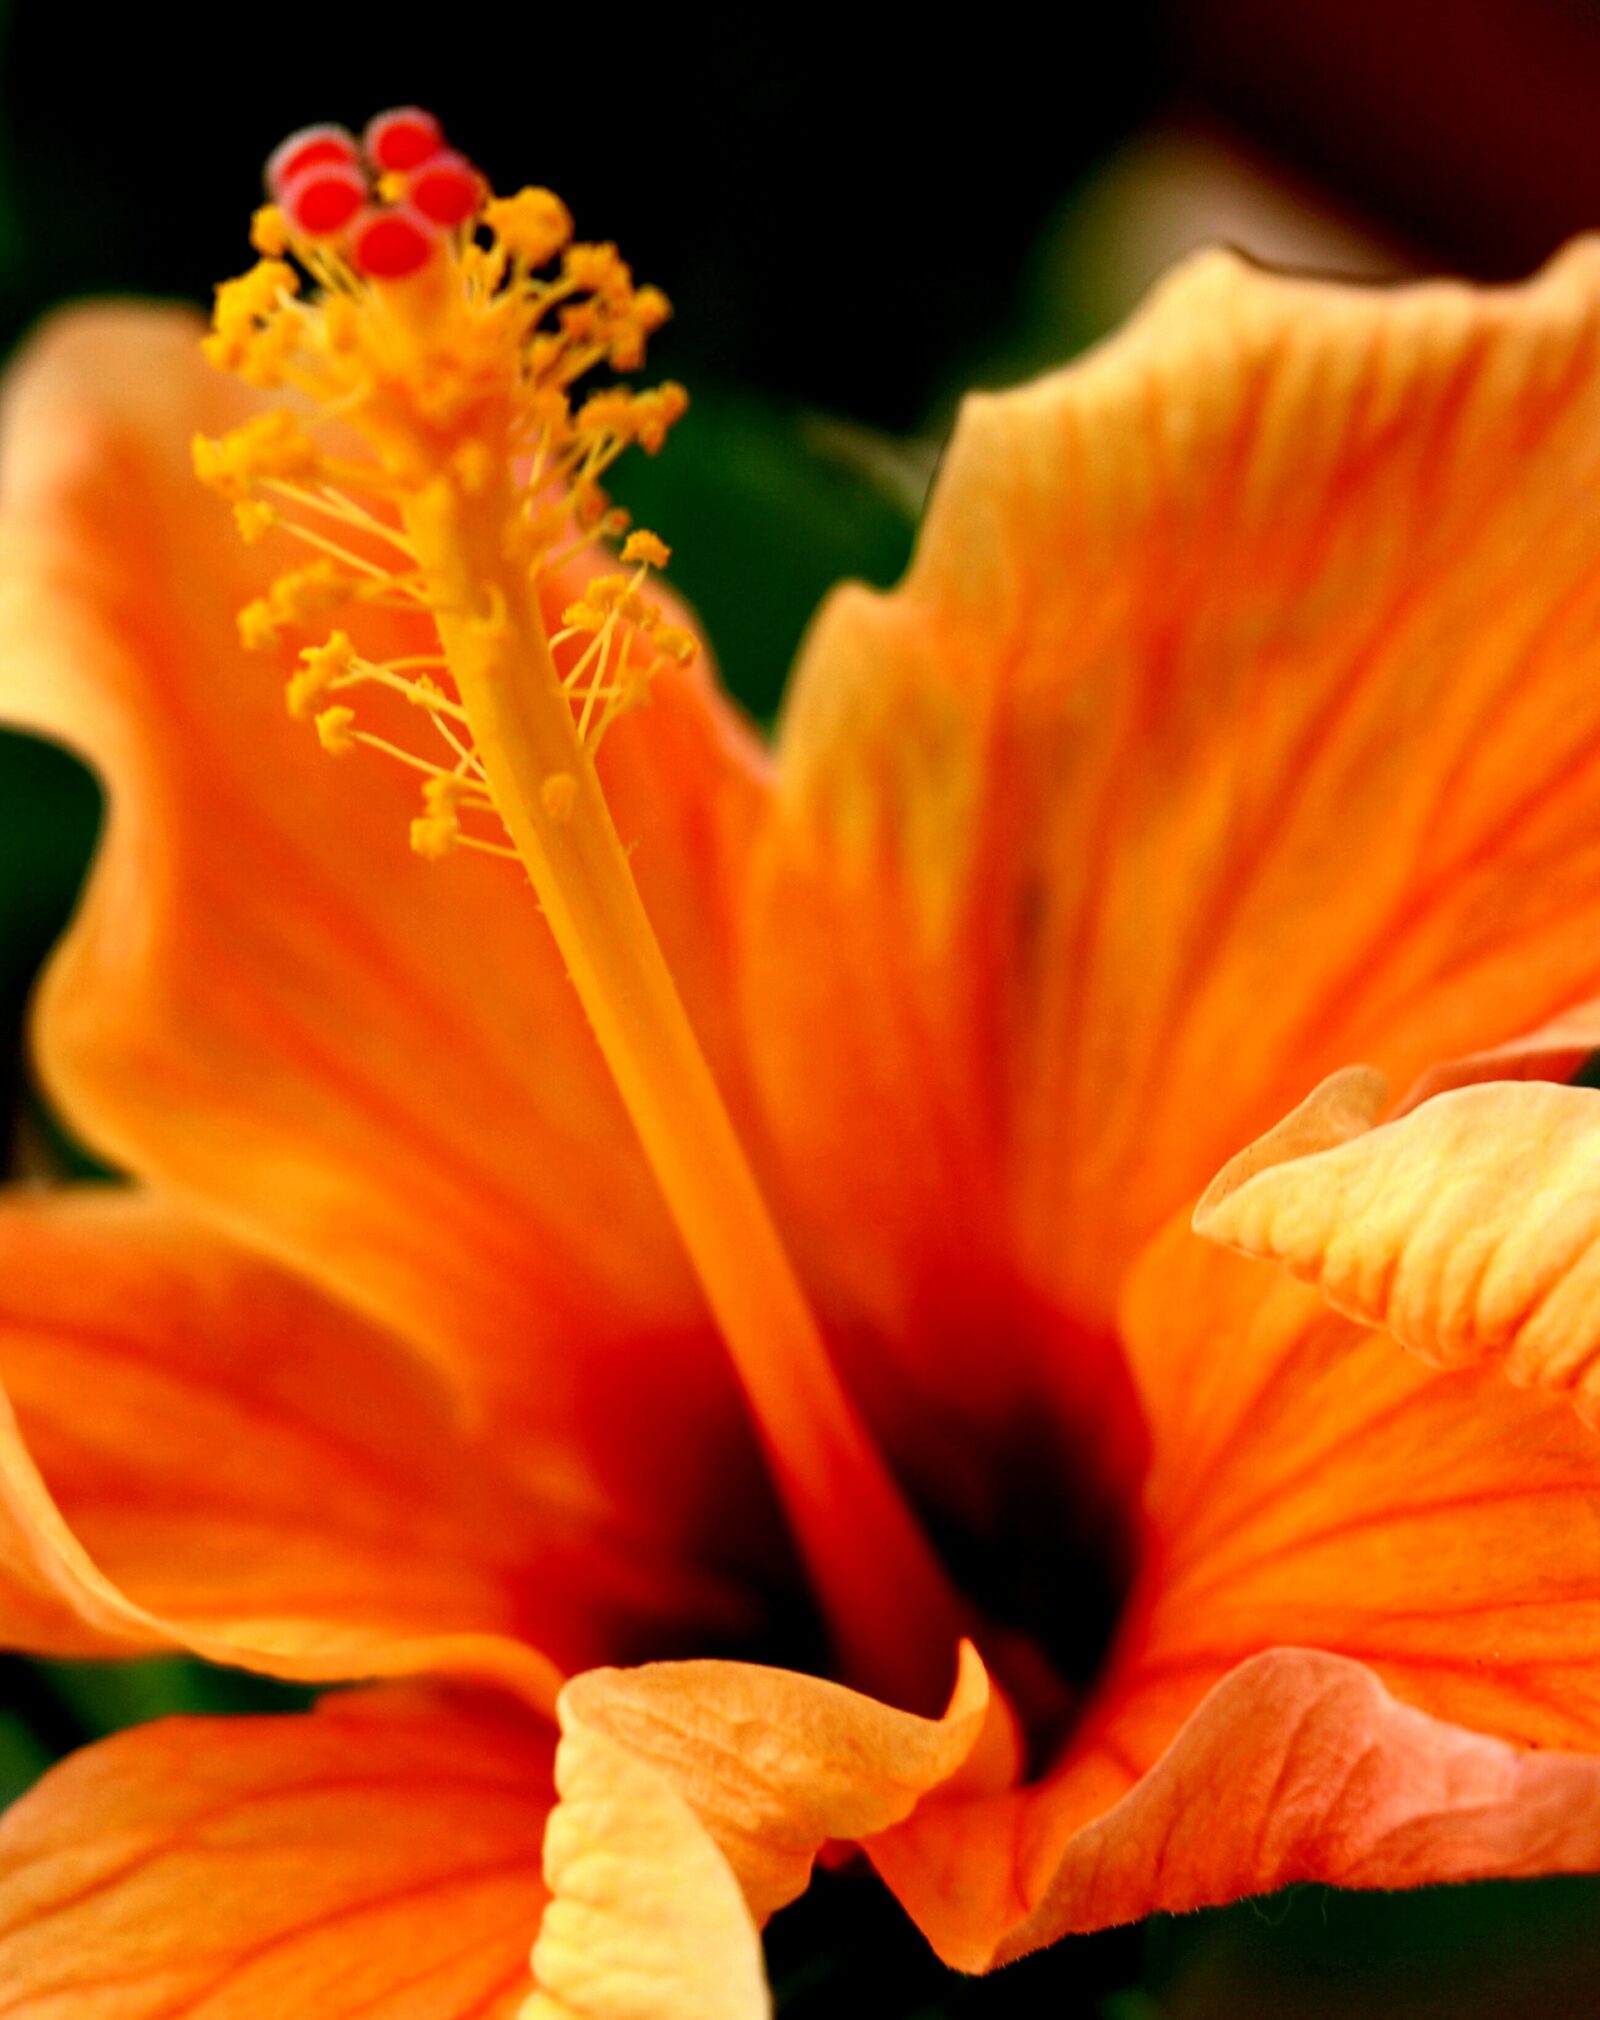
Tropical Hibiscus has to be the Hail Mary throw for any Florida gardener. These beautiful flowering shrubs are so easy to grow in our climate that cultivating a variety is a no-brainer. Tropical hibiscus care is simple and straightforward, and the amount of bloom you get for your buck (and effort) is simply incredible.

There seem to be an endless number of tropical hibiscus varieties, including some extravagantly flamboyant hybrids. Unfortunately, there are also a lot of scams floating around. If you seed tropical hibiscus for sale promising impossible-in-nature colors, it may be a complete scam.

If you live in the Southeastern U.S., specifically around the hot and humid Gulf Coast, you may have seen tropical hibiscus for sale and been tempted to purchase plants. Perhaps you thought they were fussy. They’re so pretty, they must be a pain to care for, right? Turns out, they’re not. They’re dead easy, and these showy exotics turn even the most mundane suburban spread into a tropical paradise.

Tropical Origins

Tropical hibiscus with single red flowers

Tropical hibiscus, or Hibiscus rosa-sinensis, is believed to have originated in China, particularly in the southern regions. It’s also native to India, Malaysia, Indonesia, Thailand, and the Philippines, along with the Pacific Islands, like Fiji, Samoa, Tonga, and Hawai’i.

Over the years, these beautiful plants have spread to other tropical climates in Africa, Australia, Central and South America, and the Caribbean. In these tropical regions, the hibiscus thrives in rainforests and coastal areas.

In Hawai’i, tropical hibiscus is part of native culture, making up the iconic lei garlands worn on special occasions. These blooms are worn in the hair, are used in floral displays, and signify beauty. Tropical hibiscus is also used medicinally and as offerings in spiritual ceremonies.

The tropical hibiscus embodies the spirit of “aloha’ – love, compassion, and hospitality.

How can you fail to fall in love with that?

I always like to joke that I don’t live in the Southern U.S., I live in the North Caribbean, so tropical hibiscus is one of the first ornamentals I added to our landscape.

Tropical hibiscus is a woody shrub that can reach a height of 6 to 10 feet tall, with a spread of 4 to 6 feet. The foliage is glossy and dark green, creating an attractive backdrop for its stunning flowers.

Tropical Hibiscus Flowers

Pink Tropical hibiscus flower

These evergreen plants produce large, showy blooms in a wide range of tropical hibiscus colors, including red, orange, pink, yellow, and white. These flowers can reach diameters of 4 to 8 inches and exhibit a striking trumpet-like shape. The nectar-rich flowers of tropical hibiscus attract hummingbirds and butterflies, enhancing the beauty and biodiversity of any garden.

Tropical hibiscus can be classified into two main types: singles and doubles.

Singles

Single tropical hibiscus flowers have a single row of petals, creating a striking focal point. They often feature a prominent stamen in the center. Some popular tropical hibiscus varieties feature vivid colors of red, yellow, pink, orange, and even white.

Doubles

Double tropical hibiscus flowers have multiple rows of petals, creating a fuller and more ruffled appearance. These varieties are known for their lush and showy blooms. Many of your favorite tropical hibiscus colors have a double version, as well.

In addition to these main color categories, tropical hibiscus cultivars can exhibit variations and combinations of colors, including blends, streaks, and bicolor patterns. This diverse range of tropical hibiscus colors and petal forms allows for endless possibilities in creating captivating displays and adding vibrant beauty to tropical gardens and landscapes.

Some hybrid “fancy” cultivars are even more exotic-looking, include maroon and purple and even blue. You’ll find electric pink and purple blooms, like ‘Voodoo Queen.’ Some don’t even look real, and I suspect a bit of photoshopping is going on.

Wildlife Magnets

Hummingbird visiting a red tropical hibiscus flower

Tropical hibiscus attracts various pollinators and other wildlife:

Bees

Various species of bees are attracted to the nectar-rich flowers of tropical hibiscus. This includes honeybees, bumblebees, and native solitary bees such as carpenter bees, mason bees, metallic green sweat, and mining bees.

Butterflies

Several butterfly species are drawn to the vibrant colors and nectar of hibiscus flowers. This includes swallowtails, admirals, painted ladies, and hairstreaks.

Our Florida state butterfly, the Zebra Longwing, also seems to love dive-bombing the tropical hibiscus blooms.

Florida White Butterflies with their distinctive black markings are commonly found visiting hibiscus flowers for nectar.

Hummingbirds

These small, agile birds are highly attracted to the tubular-shaped flowers of tropical hibiscus. Their long, slender beaks are perfectly adapted for sipping nectar from deep within the flower.

Ruby-throated Hummingbirds are known to visit hibiscus flowers for their nectar, especially during their migration and breeding season in Florida.

Other Wildlife

While not directly interacting with the flowers, anole lizards are often seen snoozing in hibiscus plants at night.

The flowers can also make a meal for iguanas and turtles enjoy munching on the foliage. I’ve also seen squirrels enjoying a blossom or two.

Creating a wildlife-friendly garden with tropical hibiscus can help support and attract a diverse range of critters, contributing to the overall health of the ecosystem.

Optimal Growing Conditions for Tropical Hibiscus

Pink and yellow tropical hibiscus flower

Tropical hibiscus thrives in warm and humid climates and is commonly found in tropical rainforests and coastal areas, where it enjoys the protection of tree canopies and the moist, well-drained soils prevalent in these habitats.

Light Requirements

Tropical hibiscus thrives in full sun to partial shade. It requires at least 6 hours of direct sunlight daily to promote robust growth and abundant flowering.

Soil Type

Well-draining soil is essential for tropical hibiscus. A rich, loamy soil mixed with organic matter provides the ideal growing medium. Avoid heavy clay soils that can lead to waterlogged conditions.

Tropical hibiscus (Hibiscus rosa-sinensis) generally prefers slightly acidic to neutral soil conditions. While they are not considered strict acid-loving plants like azaleas or blueberries, they can benefit from a slightly acidic soil pH in the range of 6.0 to 6.8.

Climate

Tropical hibiscus thrives in warm and humid climates. It requires consistently warm temperatures above 60°F, preferably over 80°F during the growing season for optimal growth and flowering.

Elevation

Elevation is generally not a significant concern for tropical hibiscus unless you are growing it in high-altitude regions where temperatures can drop significantly.

Tropical Hibiscus Cold Tolerance

Tropical hibiscus temperature tolerance can be a factor in USDA Zones 8 and above. Growth may slow or cease below 50°F, and temperatures near or below freezing can cause severe damage or even death to the plant.

Tropical hibiscus is not frost-tolerant and is typically grown as a container plant in regions with colder climates.

Here on the Gulf Coast, they’re a garden staple in the landscape. They’re best suited for USDA hardiness zones 9 to 11. You can probably even baby them in Zone 8 with adequate frost blankets.

Protecting from Cold: During colder months, it is crucial to protect tropical hibiscus from freezing temperatures. Move container-grown plants indoors or provide adequate insulation for in-ground specimens. Use frost cloth or blankets to cover plants and provide additional heat sources like Christmas lights for added protection.

Planting Tropical Hibiscus in the Ground

Select a suitable location. Choose a spot in your garden that receives full sun for at least six hours a day. Tropical hibiscus thrives in warm, sunny conditions.

Prepare the soil

Ensure the soil is well-draining and enriched with organic matter. Hibiscus prefers slightly acidic to neutral soil with a pH between 6.0 and 7.0. Amend the soil with compost or well-rotted manure to improve its fertility and drainage.

Dig the planting hole

Dig a hole that is slightly wider and deeper than the root ball of the hibiscus shrub. The hole should be large enough to accommodate the roots comfortably.

Remove the hibiscus from its container

Gently tap or squeeze the sides of the container to loosen the root ball. Carefully slide the hibiscus out of the container, taking care not to damage the roots.

Place the hibiscus in the hole

Position the hibiscus in the center of the hole, ensuring that it sits at the same depth as it was in the container. The top of the root ball should be level with the soil surface.

Add Amendments

For the best start, add an organic fertilizer in the planting hole that contains mycorrhizal fungi to improve nutrient uptake and root health. Compost is also another great soil amendment that adds richness to mediocre soils.

Backfill the hole

Fill the hole with the excavated soil, gently firming it around the roots as you go. Ensure there are no air pockets around the roots.

Water thoroughly

After planting, water the hibiscus thoroughly to settle the soil and hydrate the plant. Provide enough water to moisten the entire root ball as well as the soil around it.

Mulch around the plant

Apply a layer of organic mulch, such as wood chips, around the base of the hibiscus. This will help conserve moisture, suppress weeds, and regulate soil temperature.

First year care

Regularly water the hibiscus, keeping the soil evenly moist but not waterlogged. Water deeply whenever the top inch of soil feels dry.

Care of Tropical Hibiscus

White tropical hibiscus flower

Following these steps will help ensure a successful planting of your tropical hibiscus shrub. Remember to provide regular care, including watering, fertilizing, and proper maintenance, to keep your hibiscus healthy and thriving.

Watering Schedule

Tropical hibiscus prefers regular watering to keep the soil consistently moist but not waterlogged. Water deeply when the top inch of soil feels dry and adjust watering frequency based on environmental conditions.

Fertilizer Composition

Provide tropical hibiscus with a balanced fertilizer, such as a slow-release granular formula with an N-P-K ratio of 10-10-10 or 14-14-14. Feed every four to six weeks during the growing season, reducing or stopping fertilization during winter dormancy.

Horticulturists often recommend specific macronutrients and micronutrients for the optimal production of tropical hibiscus. Here are the essential nutrients that are typically recommended.

Macronutrients

Nitrogen (N) is essential for promoting leafy growth and overall plant vigor. It is particularly important during the active growth stages of tropical hibiscus.

Phosphorus (P) plays a crucial role in root development, flowering, and fruit production. It helps promote strong root systems and enhances flower and fruit formation.

Potassium (K) is vital for overall plant health, disease resistance, and flower quality. It aids in the regulation of water movement within the plant and supports the development of strong stems and roots.

Micronutrients

Iron (Fe) is necessary for chlorophyll synthesis and plays a key role in photosynthesis. It is important for maintaining healthy foliage and preventing yellowing of leaves (chlorosis).

Magnesium (Mg) is an essential component of chlorophyll and is critical for photosynthesis. It supports energy production and enzyme activation within the plant.

Zinc (Zn) is involved in various enzymatic processes and plays a role in hormone regulation, protein synthesis, and carbohydrate metabolism. It is essential for overall plant growth and development.

Manganese (Mn) is necessary for chlorophyll production and is involved in enzyme activation. It contributes to photosynthesis, nitrogen metabolism, and carbohydrate synthesis.

Copper (Cu) is required for various enzymatic reactions and is involved in plant respiration, photosynthesis, and lignin synthesis. It aids in overall plant growth and development.

It’s important to note that the specific nutrient requirements may vary depending on factors such as soil composition, growing conditions, and plant health. Conducting a soil test and consulting with your ag extension service can provide more precise nutrient recommendations tailored to your specific growing environment and goals.

Specialized Tropical Hibiscus Fertilizer

Fertilizers formulated specifically for tropical hibiscus, often labeled as “Hibiscus Fertilizer” or “Tropical Plant Fertilizer,” are available in the market and are formulated to meet the specific nutrient needs of these plants.

Fertilizing tropical hibiscus with acid-loving plant fertilizers can be beneficial if the soil pH is alkaline or if you are aiming to lower the pH slightly. Acid-loving fertilizers typically contain higher amounts of sulfur, which helps lower soil pH.

These fertilizers may also include additional nutrients that are beneficial for acid-loving plants, such as iron and manganese.

If you notice signs of nutrient deficiency or if your soil pH is consistently high, using an acid-loving plant fertilizer can help provide the necessary nutrients while also slightly adjusting the soil pH.

However, it’s important to note that tropical hibiscus can also thrive in slightly alkaline soils as long as the necessary nutrients are available.

Before applying any fertilizer, it’s recommended to conduct a soil test to determine the pH and nutrient levels of your soil.

Pruning Your Tropical Hibiscus

While tropical hibiscus is a low-care plant, it does require some pruning to make it look its best. You’ll want to prune in late winter or early spring before new growth emerges. You may also want to prune during the growing season to prevent it from becoming overgrown and leggy.

Pruning During the Growing Season.

You can prune your hibiscus back any time during the growing season as required to maintain its shape.

Timing

During the growing season, you can prune your tropical hibiscus every 4-6 weeks to maintain its size and shape. Start pruning when new growth is about 6 inches long.

Tools

Gather a pair of clean, sharp pruning shears or scissors. Ensure the tools are sanitized to prevent the spread of diseases.

Assess the Plant

Examine the hibiscus plant and identify branches that are growing too vigorously or extending beyond the desired size or shape.

Determine the Pruning Length

Decide on the amount you want to prune to control the size of the plant. Aim to remove around one-third of the branch’s length.

Prune Vigorous Branches

Locate the node or leaf joint where you want to make the cut. Position the pruning shears just above the node and make a clean, angled cut. Cutting above a node encourages new growth from that point.

Control Branch Length

To prevent the hibiscus from becoming too leggy, prune the branches to a desirable length. Identify branches that have grown excessively long or are crowding other parts of the plant, and trim them back to a suitable length, just above a node.

Remove Suckers

Suckers are new shoots that emerge from the base of the plant. They can divert energy from the main growth. Remove these suckers by pruning them at the base.

Regular Maintenance

Throughout the growing season, continue to monitor the growth of your hibiscus. As new growth appears, repeat the pruning process, removing any excessive or unwanted branches to maintain the desired size and shape.

Clean Up

After pruning, remove any fallen leaves or debris from the base of the plant to maintain a tidy and healthy growing environment.

Aftercare

Following pruning, provide your tropical hibiscus with water and fertilizer to support healthy regrowth.

By following these step-by-step instructions and regularly pruning your tropical hibiscus during the growing season, you can effectively manage its size, prevent excessive growth, and maintain the desired shape of the plant.

Remember to adjust the frequency and intensity of pruning based on the growth rate and specific needs of your hibiscus variety.

Annual Winter Pruning for Tropical Hibiscus

Double tropical hibiscus flower

Late winter or early spring is the perfect time to prune your hibiscus to remove any dead or diseased branches. This step is critical for maintaining the health of your plant.

Timing

Prune your tropical hibiscus just before it breaks dormancy, typically in late winter or early spring. This allows new growth to emerge on a well-shaped plant.

Assessment

Examine the plant for dead, damaged, or diseased branches. Look for crossing or rubbing branches that can impede airflow and create wounds.

Sterilization

Clean and sterilize your pruning tools before use. Dip the blades in disinfectant spray or wipe them down with rubbing alcohol to prevent the spread of diseases.

Thinning

Thin out overcrowded branches by selectively removing some of the older or weaker stems. Aim for an open and balanced growth habit.

Size control

If necessary, trim back the overall size of the plant to maintain a desirable shape or control its height. Cut back the branches to the desired length, just above a set of healthy leaves.

Pruning cuts

Make clean, angled cuts above leaf nodes or buds, ensuring the remaining branches face outward to encourage outward growth.

Clean-up

Remove all the pruned branches and debris from the area around the plant. This helps prevent the spread of pests and diseases.

Aftercare

After pruning, provide regular care to support new growth. Water the plant appropriately, ensure it receives adequate sunlight, and follow up with a spring feeding once new growth emerges.

Tropical Hibiscus Propagation

There are a few different methods you can use for tropical hibiscus propagation: stem cuttings, air layering, or seed propagation. Stem cuttings are the most common and easiest method.

Prepare the Cuttings

Select a healthy and mature branch of the tropical hibiscus plant. Using clean and sharp pruning shears, cut a 4-6 inch section of the stem just below a leaf node (where leaves emerge). Remove any leaves from the lower half of the cutting.

Hormone Application (Optional)

To enhance root development during tropical hibiscus propagation, you can apply a rooting hormone to the base of the cutting according to the manufacturer’s instructions. This step is optional but can increase the success rate.

Planting the Cutting

Prepare a small pot with a well-draining potting mix. Make a hole in the soil using a pencil or your finger and insert the cutting about 1-2 inches deep into the soil. Firmly press the soil around the cutting to secure it.

Provide Ideal Conditions

Place the pot in a warm and bright location with indirect sunlight. Maintain a consistent temperature between 70-80°F (21-27°C). Keep the soil moist but not waterlogged. You can cover the pot with a plastic bag or place it in a propagation tray to create a humid environment.

Root Development

Over the next several weeks, the cutting will develop roots. Check the soil moisture regularly and mist the leaves if necessary to maintain humidity. Avoid direct sunlight, as it can scorch the cutting.

Transplanting

Once the cutting has developed a healthy root system, usually after 6-8 weeks, you can transplant it into a larger pot or into the garden if the conditions are suitable. Ensure the soil is well-draining and provide adequate watering and care as the plant establishes itself.

Note: Tropical hibiscus propagation from seed is also possible but requires more time and effort. It’s an approach for expert gardeners. It involves harvesting and germinating the seeds, followed by nurturing the seedlings until they are ready for transplanting.

Winter Care for Tropical Hibiscus

Protecting tropical hibiscus during the winter is crucial in regions where temperatures drop below their cold tolerance. Here are some steps to help safeguard your plants:

Timing

Begin winter protection measures when temperatures consistently fall below 50°F (10°C) or when frost is expected.

Pruning

Before the first frost, consider pruning your tropical hibiscus to a manageable size. Remove any dead or diseased branches and aim for a compact shape.

Mulching

Apply a layer of organic mulch around the base of the plant, such as straw or wood chips. This helps insulate the roots and retain moisture.

Covering

Use frost blankets, burlap, or old bedsheets to cover the entire plant during extremely cold nights. Secure the cover loosely to allow for airflow and prevent moisture buildup.

Remove the cover as soon as possible after sunrise. If temperatures are expected to drop for several nights in a row, you can leave the covers on.

Container plants

If your hibiscus is in a container, move it to a protected area like a garage or basement. Ensure the plant receives adequate light and water sparingly to prevent root rot.

Watering

During winter, reduce watering frequency to avoid waterlogged soil. Only water when the top inch of soil feels dry to the touch.

If the cold snap will be brief, water the day before the overnight temperatures drop. Water early enough to allow the day’s sunlight to heat the root zone. This will help keep the soil around the plant warmer overnight.

However, this technique is not suitable for longer cold spells. If you are expecting several nights of cold weather, don’t water until the weather warms enough to remove the coverings.

Temperature monitoring

Keep an eye on weather forecasts and be prepared to provide additional protection if unexpected cold snaps occur.

By implementing these measures, you can help protect your tropical hibiscus from winter damage and promote its health for the following growing season.

Tropical Hibiscus Pests and Diseases

Keep an eye out for common pests like aphids, spider mites, and whiteflies. Treat any infestations promptly using appropriate organic or chemical controls. Monitor for signs of diseases like leaf spot or powdery mildew and take necessary steps to address them.

Common Pests

Common pests affecting tropical hibiscus include aphids, whiteflies, spider mites, and mealybugs. Regularly inspect the plant for signs of infestation.

Here’s some guidance on identifying common insect pests that can infest tropical hibiscus:

Aphids

Look for clusters of small, soft-bodied insects on the undersides of leaves, flower buds, or stems.

Aphids can be green, black, brown, or other colors, depending on the species.

They often leave behind a sticky residue called honeydew, which can attract ants and promote the growth of sooty mold.

Whiteflies

Whiteflies are tiny, white or pale yellow insects that resemble small moths. They can be found on the undersides of leaves, typically in large numbers. When disturbed, whiteflies will fly up in a cloud of tiny insects.

Spider Mites

Spider mites are very small and may appear as tiny dots on the leaves. Look for fine webbing on the undersides of leaves, especially in cases of severe infestation. Spider mites can cause stippling or yellowing of the foliage.

Mealybugs

Mealybugs are soft-bodied insects covered in a white, cottony, waxy substance. They tend to congregate in protected areas, such as leaf axils, leaf undersides, and stem joints. Look for cottony masses and sticky residue on the plant surface.

Oleander caterpillars

Oleander caterpillars are vibrant and distinctive in appearance. They have a black body with bright orange or red stripes running along their length. The caterpillars have a slightly hairy or spiky texture.

When inspecting your hibiscus for pests, be sure to examine the undersides of leaves, as many pests prefer to hide in those areas. Additionally, closely monitor the overall health of your plant for signs of wilting, yellowing leaves, or stunted growth, as these can be indicators of a pest infestation.

Pest Remedy

Control pests by spraying the plant with an appropriate insecticide, focusing on the undersides of leaves where pests often congregate. Follow the product instructions and repeat applications as necessary.

Common Diseases

Tropical hibiscus can be susceptible to diseases such as leaf spot, root rot, and powdery mildew. Ensure proper watering practices, good air circulation, and avoid overhead watering to minimize disease incidence.

Leaf Spot

Leaf spot is a common fungal disease that affects tropical hibiscus. Look for circular or irregularly shaped spots on the leaves, usually with defined margins. The spots can vary in color, ranging from brown, black, or yellow to dark purple.

As the disease progresses, the spots may enlarge and merge, leading to the yellowing and defoliation of affected leaves.

Root Rot

Root rot is a fungal disease caused by overwatering, poor drainage, or soilborne pathogens. Observe the plant for signs of wilting or yellowing leaves that don’t respond to watering.

Gently remove the plant from the pot or dig around the root zone to inspect the roots. Healthy roots should appear white or off-white, while rotting roots may appear brown, mushy, or have a foul odor.

Severely affected plants may exhibit stunted growth and eventually die.

Powdery Mildew

Powdery mildew is a fungal disease characterized by a white or grayish powdery growth on the foliage. Look for a fine, talcum-like coating on the upper surfaces of leaves, stems, and even flowers.

Affected leaves may become distorted, curl, or drop prematurely. In severe cases, the powdery growth can cover a significant portion of the plant, inhibiting photosynthesis and weakening its overall health.

When identifying these diseases, careful observation of the plant’s symptoms and characteristics is essential. If you suspect any of these diseases, it is recommended to take appropriate measures for prevention, treatment, and control to minimize their impact on your tropical hibiscus.

Disease Remedy

To combat diseases, remove and dispose of affected plant material, improve air circulation, and apply appropriate fungicides as recommended by a local garden center or professional.

Special Needs or Care

Tropical hibiscus benefits from regular grooming to remove spent flowers and encourage continuous blooming. Additionally, the plant may require occasional staking or support as it grows taller to maintain an upright habit.

Yellow Leaves Troubleshooting

Several factors can contribute to yellowing leaves in tropical hibiscus. Here are some common causes:

Overwatering

Excessive watering can lead to waterlogged soil and root rot, resulting in yellowing leaves. Ensure proper drainage and avoid overwatering the plant.

Underwatering

On the other hand, if the plant is not receiving enough water, the leaves may turn yellow and wilt. Check the soil moisture regularly and water the plant when the top inch of soil feels dry.

Nutrient Deficiencies

Yellowing leaves can be a sign of nutrient deficiencies, such as iron or nitrogen. A lack of essential nutrients can affect the plant’s ability to photosynthesize and maintain healthy foliage. Fertilize the plant with a balanced fertilizer formulated for tropical plants to ensure it receives adequate nutrients.

Environmental Stress

Tropical hibiscus is sensitive to environmental changes. Exposure to cold temperatures, drafts, or sudden temperature fluctuations can cause leaves to yellow and drop. Ensure the plant is placed in an appropriate location with stable temperatures.

Pests and Diseases

Infestations of pests like aphids, whiteflies, or spider mites, as well as diseases like leaf spot or powdery mildew, can cause yellowing leaves. Inspect the plant regularly for any signs of pests or diseases and take appropriate measures for control.

Natural Leaf Shedding

It is normal for tropical hibiscus to shed older leaves as part of their natural growth cycle. If the yellowing is limited to older leaves at the bottom of the plant, it may be a natural process.

By identifying the specific cause of yellowing leaves, you can take appropriate steps to address the issue and promote healthy foliage growth in your tropical hibiscus.

Landscaping Design Ideas for Tropical Hibiscus

Tropical hibiscus adds a vibrant and tropical touch to any landscape. Plant it as a focal point in garden beds, mix it with other tropical plants for a lush oasis, or grow it in containers to add color to patios and balconies.

Create tropical-themed gardens by combining tropical hibiscus with companion plants such as palms, bird of paradise, or ginger lilies for a stunning display of foliage and flowers.

Companion Plants for Tropical Hibiscus

The following plants have similar water, sunlight, and soil requirements as tropical hibiscus, so should be suitable for companion planting in your landscape.

Flowering Plants

  • Bird of Paradise (Strelitzia reginae)
  • Ixora (Ixora spp.)
  • Plumeria (Plumeria spp.)
  • Ti Plant (Cordyline fruticosa)
  • Firebush (Hamelia patens)

Flowering Bulbs:

  • Canna Lily (Canna spp.)
  • Ginger Lily (Hedychium spp.)
  • Blood Lily (Haemanthus spp.)
  • Amazon Lily (Eucharis spp.)
  • Spider Lily (Hymenocallis spp.)

Perennial Flowering Shrubs

  • Bougainvillea (Bougainvillea spp.)
  • Mandevilla (Mandevilla spp.)
  • Plumbago (Plumbago auriculata)
  • Mexican Petunia (Ruellia brittoniana)
  • Shrimp Plant (Justicia brandegeana)

Creating a Tropical Paradise with Hibiscus

Tropical hibiscus (Hibiscus rosa-sinensis) is a captivating and vibrant plant native to warm tropical regions. Its glossy foliage and large, showy flowers make it a delightful addition to gardens and landscapes.

By providing the right growing conditions, including adequate sunlight, well-drained soil, and protection from cold temperatures, you can enjoy the beauty of tropical hibiscus throughout the year.

Remember to care for your plant by regular watering, appropriate fertilization, and addressing any pests or diseases promptly. With proper care, tropical hibiscus will reward you with its stunning blooms and bring a touch of the tropics to your garden.

FAQ – Frequently Asked Questions About Growing Tropical Hibiscus

How tall do tropical hibiscus get?

Tropical hibiscus can grow anywhere from 3 to 10 feet tall, depending on the specific variety and growing conditions. Compact varieties are more suitable for containers or smaller spaces and may stay around 3 to 4 feet tall, while larger varieties can reach heights of 6 to 10 feet.

What is the lowest temperature for tropical hibiscus?

Tropical hibiscus is generally not tolerant of freezing temperatures. Prolonged exposure to temperatures below 28°F for several hours or more is likely to cause severe damage or kill the plant.

What is the tropical hibiscus growth rate?

The growth rate of tropical hibiscus can range from 6 to 12 inches in height per year during the peak growing season.

Is tropical hibiscus annual or perennial?

Tropical hibiscus is a perennial plant in its native tropical and subtropical regions where it can thrive year-round. However, in areas with cold winters, tropical hibiscus is often grown as an annual or treated as a tender perennial.

What are the signs of tropical hibiscus frost damage?

Frost damage on a tropical hibiscus plant typically manifests as wilting, browning, or blackening of the foliage and stems. The leaves may become limp and appear water-soaked. In severe cases, the plant may exhibit leaf drop or defoliation.

Do tropical hibiscus come back every year?

No, tropical hibiscus will not grow back after a cold winter in temperate climates. However, in frost-free regions or with proper protection, it may survive and continue to grow year-round.

What is the cause if my tropical hibiscus lost all leaves?

There can be several possible causes for a tropical hibiscus plant losing all its leaves. It could be due to environmental stressors such as cold temperatures, frost damage, or excessive exposure to direct sunlight. Overwatering or underwatering can also lead to leaf drop.

Can you grow tropical hibiscus from seed?

Yes, you can grow a tropical hibiscus from seed. However, it’s important to note that tropical hibiscus seeds can be a bit challenging to germinate and require specific conditions for successful growth.

What is the difference between tropical hibiscus vs hardy hibiscus?

Tropical hibiscus thrives in warm, tropical or subtropical climates and cannot tolerate freezing temperatures, while hardy hibiscus is adapted to colder regions and can withstand freezing temperatures.

Is tropical hibiscus tea safe to drink? Is tropical hibiscus what they use to make tea?

Yes, tropical hibiscus, specifically Hibiscus sabdariffa, is the variety commonly used to make herbal tea known as hibiscus tea or roselle tea. The calyces (the fleshy covering around the seed pod) of the Hibiscus sabdariffa plant are harvested and used to make the tea.

Do hibiscus grow better in pots or ground?

Hibiscus can thrive both in pots and in the ground, but each option has its considerations. When grown in pots, hibiscus plants offer the advantage of portability, allowing you to move them indoors during colder months or place them in optimal locations for sunlight. Potted hibiscus may require more frequent watering and fertilization due to limited soil volume.

How hot is too hot for hibiscus?

The optimal temperature range for hibiscus is typically between 60°F (15°C) and 90°F (32°C). When temperatures consistently exceed 90°F (32°C), hibiscus may experience reduced growth, wilting, leaf drop, and flower damage. High heat combined with intense sunlight can also lead to sunburn on the leaves.

How do you keep hibiscus blooming?

Ensure your tropical hibiscus receives consistent moisture. Feed your tropical hibiscus plant with a water-soluble bloom booster for acid-loving plants. Then work in some slow-release fertilizer formulated for flowering plants around the root zone and apply a layer of organic mulch to help retain moisture. Deadheading regularly will encourage the development of new buds.

Where can I find tropical hibiscus plants for sale?

Our nursery carries tropical hibiscus for sale and can ship them conveniently to your home. Visit our shop at: https://southerngarden.net/shop/