Posted on

Perpetual Spinach Chard: Heat-Tolerant Greens for Subtropical Gardens

perpetual spinach chard

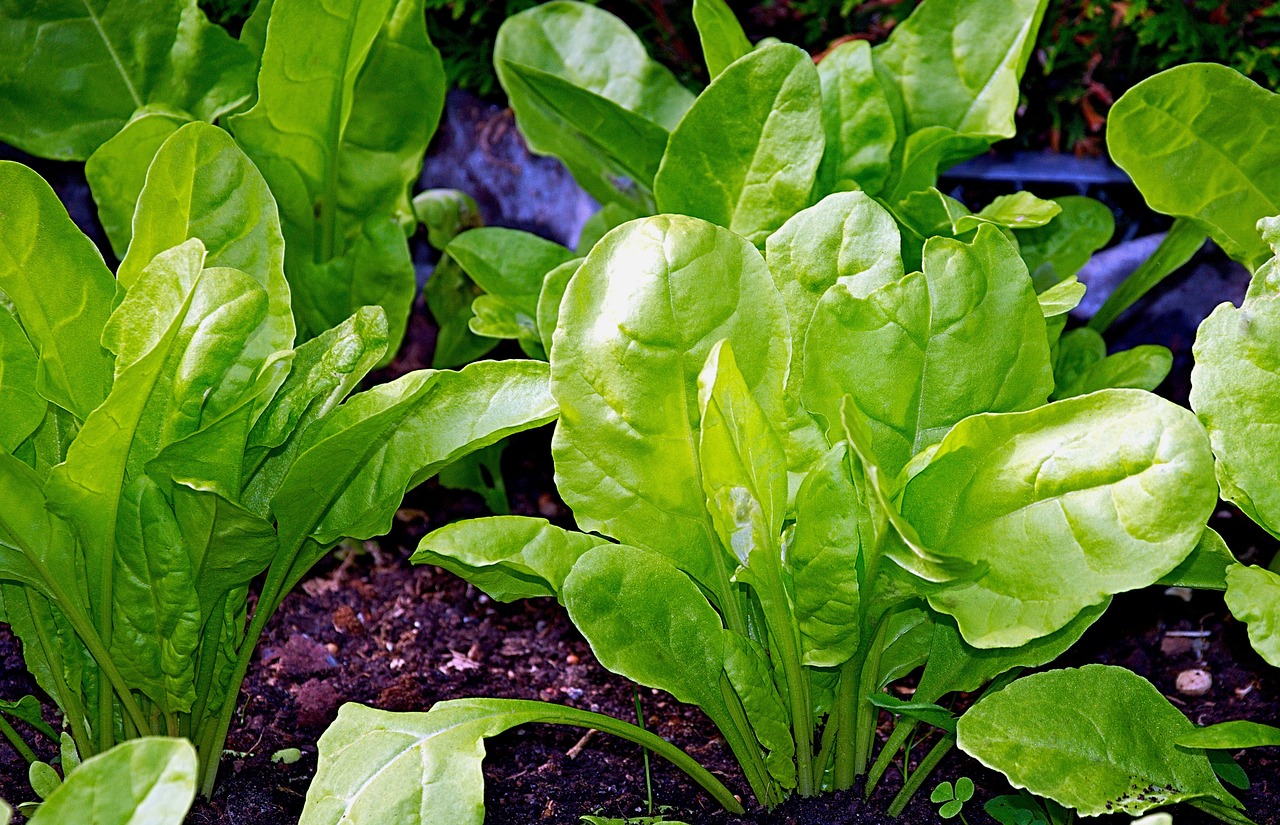
Perpetual spinach chard is a rare leafy vegetable that thrives in subtropical climates. With its rich heritage and impressive adaptability, this hardy plant is a must-have for gardeners residing in warmer zones 9 through 11.

Perpetual spinach chard, scientifically known as Beta vulgaris subsp. cicla var. cicla ‘Perpetual Spinach’, belongs to the beet family. It is believed to have originated in the Mediterranean region, where it was cultivated for centuries. This versatile vegetable has a long history of culinary use, with its origins dating back to ancient Greek and Roman times.

Perpetual Spinach Chard Plant Details

Perpetual spinach chard features large, tender leaves that are glossy and dark green, similar to true spinach but with a slightly thicker texture. The leaves grow on sturdy, succulent stalks.

The plant has a biennial growth habit, although it is often cultivated as an annual in cooler climates. It typically reaches maturity within 55 to 60 days from sowing. When fully grown, this leafy vegetable forms a compact rosette of lush foliage, reaching a height of about 12 to 18 inches and spreading approximately 12 inches in width. Its compact size makes it an excellent choice for container gardening as well.

Where and When to Grow Perpetual Spinach

For gardeners residing in the U.S. perpetual spinach chard thrives in subtropical regions with warmer climates. Specifically, it performs exceptionally well in USDA Hardiness Zones 9 through 11. The milder winters and longer growing seasons found in these areas create the perfect conditions for this robust leafy green.

perpetual spinach in the garden

Optimal Growing Conditions for Perpetual Spinach Chard

For the best results and the most abundant harvest, keep the following factors in mind.

Temperature

Perpetual spinach chard thrives in moderate temperatures, preferring a range between 60°F and 80°F. However, it is very heat tolerant and will tolerate cold snaps down to 32°F. Growth will slow during extreme heat and cold.

Humidity

The plant prefers moderate humidity levels. While it can tolerate higher humidity, it is important to provide good air circulation to prevent fungal diseases.

Sunlight

Perpetual spinach chard requires full sun to partial shade, with a minimum of 4 to 6 hours of direct sunlight each day. In hotter regions, providing some afternoon shade can help prevent wilting or scorching of the leaves. It’s suitable for shady patches of the garden in subtropical zones.

Soil Type

It thrives in well-drained, fertile soil rich in organic matter. It prefers a slightly acidic to neutral pH level between 6.0 and 7.0. Amending the soil with compost or well-rotted manure before planting will help provide the necessary nutrients and improve soil structure.

Buy seeds

Planting Times

Since perpetual chard acts as a perennial edible plant in subtropical zones, you can plant it nearly any time of year. However, avoid planting out during the hottest or coldest times.

For spring planting, start indoors up to 8 weeks before the last frost date and plant out once that date has passed.

In the summer or fall, start seeds indoors, and plant out once the plant has fully developed (about 8 weeks). For best cold resilience, sow and establish at least one month before the first frost date.

Starting Perpetual Spinach Chard Seeds

We recommend starting perpetual chard seeds in cell trays or soil blocks. This allows you to plant out a healthy, well-developed young plant that is more resistant to pests and disease.

  • Fill cell trays or soil blocks with a high-quality seed-starting mix, moistening it slightly before planting.
  • Sow the seeds about ¼ to ½ inch deep.
  • Place the trays or blocks in a warm location with temperatures around 70°F to 75°F.
  • Maintain consistent moisture by misting the soil surface or using a bottom-watering technique.
  • Germination typically occurs within 7 to 14 days.

Once the seedlings have developed their second set of true leaves, you can transplant them into the garden. However, we recommend planting out once the plant is 6” and has developed several sets of true leaves. This ensures it will better survive transplant shock or environmental pressures.

Transplanting Perpetual Spinach Chard

Once you have healthy young seedlings, you’ll want to transplant them into your garden or into a larger container.

Into Garden Beds:

  1. Choose a well-prepared garden bed with loose, amended soil.
  2. Dig holes that are slightly larger than the root ball of the seedling.
  3. Gently remove the seedlings from the module cell or soil block tray, taking care not to damage the roots.
  4. Place the seedlings into the holes and backfill with soil, firming it gently around the base of the plants.
  5. Space the plants 8 to 12 inches (20 to 30 cm) apart to allow sufficient room for growth.
  6. Water the newly transplanted seedlings thoroughly to help them establish.

Into Containers:

Select containers that are at least 6 to 8 inches deep to accommodate the root system.

  1. Fill the containers with a well-draining potting mix, leaving about an inch of space below the rim.
  2. Gently remove the seedlings from the cell trays or soil block trays, being careful not to disturb the roots.
  3. Place the seedlings in the center of each container and fill in the remaining space with potting mix.
  4. Water the containers thoroughly until excess water drains from the bottom.

Temp Tolerance for Perpetual Spinach

Perpetual chard may require some extra care when the weather is extreme.

Protect from Excessive Heat

High temperatures above 95°F can cause the leaves to wilt, scorch, and lose flavor. Providing shade or mulching can help protect the plants during extreme heat.

Protection from Cold

To protect perpetual chard from a deep cold snap, apply a layer of mulch around the base of the plants to insulate the roots and conserve moisture. Cover the plants with row covers or frost blankets during freezing temperatures.

Watering Schedule

During the winter and spring, water the plants deeply once or twice a week, ensuring the soil remains consistently moist but not waterlogged.

During the summer and fall, water as needed to provide moisture if it doesn’t rain adequately.

Fertilizer Composition and Schedule

Prior to planting, incorporate compost or well-rotted manure into the soil for nutrient enrichment.

During the growing season, apply a balanced organic fertilizer or a slow-release granular fertilizer according to the package instructions every 4 to 6 weeks.

Avoid excessive nitrogen fertilization, as it can promote leafy growth at the expense of root development. Opt for a balanced fertilizer instead.

Common Pests

Perpetual spinach chard may be subject to a few pests.

Aphids: Use a strong blast of water or insecticidal soap to control aphid infestations.

Slugs and Snails: We recommend Sluggo baits, which are very effective, very affordable, and certified OMRI for organic use.

Leaf Miners: Remove infested leaves and destroy them to reduce leaf miner populations.

Caterpillars: Handpick caterpillars or use organic insecticides labeled for vegetable use. We recommend products containing a naturally occurring bacteria called Bacillus thuringiensis (or bt for short), such as Thuricide.

Similar products that contain Spinosad are also organic and are affective against a wider range of pest insects, including aphids. Monterey’s Spinosad is an excellent choice.

Common Diseases

Downy Mildew: Ensure good air circulation, avoid overhead watering, and apply appropriate fungicides if necessary.

Leaf Spot: Remove affected leaves and practice good sanitation to prevent the spread of the disease.

For significant infections, we recommend applying an organic copper spray after removing the affected foliage.

Powdery Mildew: Improve air circulation, avoid overhead watering, and apply fungicides labeled for powdery mildew control. Apply a mixture of 8 Tbs of household hydrogen peroxide (3%) mixed with one gallon of water with a sprayer every three days for a week or two for an inexpensive organic fungicide against powdery mildew.

Regularly monitor your plants for any signs of pests or diseases and take prompt action to prevent damage or spread.

Special Needs and Care for Perpetual Spinach Chard

Thinning: When sowing directly, think seedlings when they reach a height of about 2 to 3 inches to ensure proper spacing between plants. Remove the weaker seedlings, leaving the healthiest and strongest ones to grow. These plants grow best when spaced at around 12”.

Mulching: Apply a layer of organic mulch around the base of the plants to help conserve moisture, suppress weed growth, and regulate soil temperature.

Companion Plants for Perpetual Spinach

Perpetual spinach chard can benefit from companion planting, which involves growing compatible plants in close proximity to enhance growth, deter pests, and promote overall garden health. Here are some suitable companion plants for perpetual chard:

Herbs

Plant aromatic herbs like basil, dill, parsley, and cilantro near perpetual spinach chard to repel pests and attract beneficial insects.

Nasturtiums

Nasturtiums serve as sacrificial plants, attracting pests like aphids away from perpetual chard.

Harvesting Perpetual Spinach

Regularly harvest outer leaves when they reach a size of about 6 to 8 inches long. This will encourage continuous growth and prevent the plants from bolting.

If the plants start to bolt (produce flower stalks), it is best to remove them to maintain quality. Alternatively, you can allow them to flower for your bee population and to collect seeds once matured.

Perpetual chard can be harvested as soon as the outer leaves reach a desirable size. Here’s how to harvest:

  • Select the outer leaves, starting with the largest ones, leaving the smaller inner leaves to continue growing.
  • Use a sharp knife or scissors to cut the leaves off at the base, or you can gently twist and pull them from the stem.
  • Harvest regularly to encourage new leaf growth and a continuous harvest throughout the growing season.

Cooking with Perpetual Spinach

Perpetual spinach chard is a versatile leafy green that can be enjoyed in various culinary creations. Here are some cooking and meal ideas:

Fresh Salads

Use young and tender leaves as a nutritious base for salads. Mix with other greens, add your favorite toppings, and dress with a light vinaigrette.

Sautéed or Stir-Fried

Heat olive oil or butter in a pan, add chopped leaves, and sauté with garlic, onions, or other vegetables for a flavorful side dish. Stir-frying with soy sauce and sesame oil also creates a delicious Asian-inspired dish.

Quiches and Frittatas

Add cooked and chopped leaves to quiches, frittatas, or egg muffins for a nutrient-packed and flavorful meal.

Soups and Stews

Incorporate into soups, stews, or hearty winter dishes for added nutrition and a vibrant green color.

Wraps and Sandwiches

Use large perpetual spinach chard leaves as a substitute for tortillas or bread in wraps and sandwiches for a healthy and low-carb option.

Experiment with different recipes and cooking techniques to make the most of the versatile chard in your culinary endeavors. Enjoy the fresh and vibrant flavors it brings to your meals!

Your Subtropical Garden Needs Perpetual Spinach Chard

Perpetual chard is a versatile and visually appealing addition to subtropical gardens in the United States. Its origins in the Mediterranean region and its ability to flourish in warmer climates make it an ideal choice for gardeners in USDA Hardiness Zones 9 through 11.

Whether used as an ornamental plant or harvested as a nutritious leafy green, perpetual spinach chard offers gardeners a delightful and productive gardening experience.

You can purchase seeds for perpetual spinach chard from our website.

FAQ – Frequently Asked Questions About Growing and Using Perpetual Spinach

Why is it called perpetual spinach?

Perpetual spinach got its name because it produces a continuous harvest of spinach-like leaves throughout the growing season.

What are some perpetual spinach chard benefits?

Perpetual chard is packed with vitamins, minerals, and antioxidants, supports immune health, promotes digestion, and provides essential nutrients.

What is the difference between spinach and perpetual spinach?

It has thicker leaves and sturdier stalks compared to true spinach. It is much more heat tolerant and tends to have a longer growing season.

Does perpetual spinach taste like spinach?

Yes, it has a mild, slightly sweet taste similar to true spinach but with a heartier texture.

Can you eat perpetual spinach stalks?

Yes, the succulent stalks are edible and can be enjoyed in various culinary preparations.

Is perpetual spinach the same as chard?

Yes, perpetual spinach is a type of chard, specifically a variety that resembles and tastes like true spinach.

What is another name for perpetual spinach?

Another name for perpetual spinach is “leaf beet.”

What grows well with perpetual spinach?

It grows well with herbs like basil and dill, brassicas like broccoli, and beans.

How do you cook perpetual spinach?

You can cook it by sautéing, stir-frying, adding to soups or stews, or using it raw in salads and wraps.

How long will perpetual spinach last?

With regular harvesting and proper care, you’ll get a continuous harvest for several months. In subtropical regions with mild winters, it will easily last for a year or more.

What is perpetual spinach good for?

It’s good for adding nutrition to meals, supporting overall health, and providing a versatile leafy green option in climates that are too hot to grow traditional salad greens.

How do you maintain perpetual spinach?

Maintain the plant by ensuring consistent moisture, proper spacing, regular harvesting, and protecting from extreme temperatures.

Where do you cut perpetual spinach?

When harvesting, cut the outer leaves close to the base of the plant, leaving the inner leaves to continue growing.

What does perpetual spinach taste like?

It has a mild, slightly sweet taste with a hint of nuttiness.

Is perpetual spinach the same as New Zealand spinach?

No, perpetual spinach and New Zealand spinach are different plants, although they are both leafy greens commonly used as spinach alternatives.

Posted on

Learn How to Grow Bananas in Florida

Grow Bananas in Florida

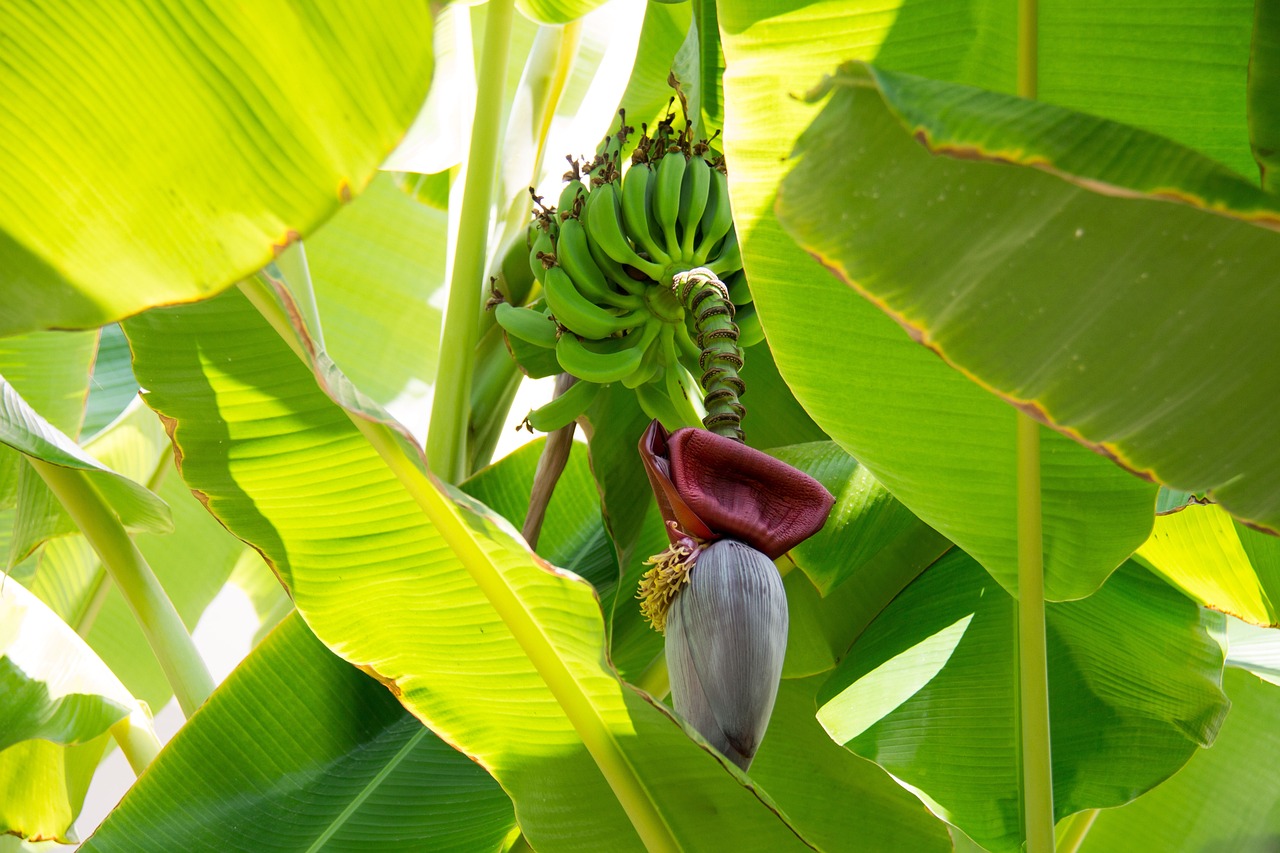
If you’re a Florida gardener dreaming of growing your own tropical fruit paradise, look no further than the magnificent banana plant. With their lush foliage and delicious fruit, bananas can thrive in Florida’s subtropical climate. Let’s explore the best varieties suited for each zone, share valuable tips on growing conditions, soil requirements, and planting times, and find out more about how to grow bananas in Florida.

Ornamental vs. Edible Bananas

Before we delve into the specifics, it’s important to distinguish between ornamental and edible bananas. While both types offer stunning foliage, ornamental varieties produce inedible or barely edible fruit. To truly enjoy the flavor and sweetness of homegrown bananas, opt for edible varieties specifically bred for fruit production.

It’s important to note that while these ornamental varieties add visual interest to gardens, their fruit is either inedible or of very poor quality. Therefore, for those looking to grow bananas for their delicious fruit, it’s essential to select edible banana varieties specifically bred for fruit production.

Here are some varieties to avoid if you’re hoping for a harvest:

  1. Musa ornata: Known for its vibrant pink inflorescence and attractive dark green leaves with red midribs, this ornamental banana adds a touch of tropical beauty to gardens.
  2. Musa velutina: Also called the Pink Banana, this variety showcases stunning pink fruits and velvety pink bracts. It’s a favorite among collectors for its ornamental appeal.
  3. Ensete ventricosum ‘Maurelii’: While technically a close relative of the banana, this ornamental variety, commonly known as the Red Abyssinian Banana, is primarily grown for its striking red foliage.
  4. Musa sikkimensis ‘Red Tiger’: This ornamental banana boasts maroon-red leaves with prominent green stripes, creating a visually captivating display in gardens and landscapes.

Best Banana Varieties to Grow in Florida

Growing bananas successfully in Florida requires selecting suitable varieties for each USDA zone. Let’s explore some of the top banana types known to thrive in the Sunshine State:

North Florida / Zone 8:

  1. ‘Dwarf Cavendish’ (Musa acuminata): This compact variety grows well in containers, making it ideal for Zone 8 gardens. It produces tasty, medium-sized bananas with a pleasant flavor profile.

Central Florida / Zone 9:

  1. Goldfinger Banana (FHIA-01): Resistant to Panama disease, this variety excels in Zone 9. Its creamy fruit has a sweet flavor reminiscent of dessert bananas.
  2. Lady Finger Banana (Musa acuminata ‘Lady Finger‘): Thriving in Zone 9, these slender, aromatic bananas offer a delicate and sweet taste.

South Florida / Zone 10:

  1. Mona Lisa Banana (FHIA-2): Perfect for Zone 10, this variety produces large bunches of sweet, aromatic bananas. It offers excellent disease resistance and handles Florida’s hot climate well.
  2. Honey Banana (Musa johnsii): Well-suited for Zone 10, this unique banana variety features a honey-like flavor and attractive red-purple skin when ripe.

Choosing Banana Plants for Your Florida Garden

I don’t know about you, but when they’re small, all bananas pretty much look the same to me. It’s always a good idea to choose the variety carefully, so look for the label when you’re at your local nursery. If you don’t see one, ask someone. You really don’t want to end up with an ornamental type when you’re hoping to be making home-grown banana bread someday.

Dwarf Cavendish

‘Dwarf Cavendish’ (Musa acuminata) is a popular banana variety renowned for its compact size and delectable fruit. This cultivar typically reaches a height of around 6 to 8 feet (1.8 to 2.4 meters) at maturity, making it an excellent choice for smaller gardens or container cultivation.

The ‘Dwarf Cavendish’ features broad, lush green leaves that create a tropical ambiance wherever it grows. This variety takes approximately 2 to 3 years to reach maturity and begin flowering, producing pendulous clusters of creamy yellow fruit.

The fruit of the ‘Dwarf Cavendish’ is medium-sized, with a smooth, thin skin that turns yellow when ripe. Its flavor is delightfully sweet, often described as having a subtle and creamy banana taste with hints of tropical notes.

When fully ripened, the ‘Dwarf Cavendish’ offers a luscious and satisfying eating experience, making it a favorite choice for banana enthusiasts.

Goldfinger

The Goldfinger Banana (FHIA-01) is a remarkable banana variety known for its resistance to several diseases, making it an excellent choice for growers. This hybrid cultivar combines the genetics of the wild banana (Musa balbisiana) and the Dwarf Cavendish (Musa acuminata).

At maturity, the Goldfinger Banana typically reaches a height of 8 to 10 feet (2.4 to 3 meters) with a spread of about 4 to 6 feet (1.2 to 1.8 meters). It exhibits sturdy and upright growth habits, producing large, attractive leaves with green foliage. The Goldfinger Banana matures in approximately 9 to 12 months and starts flowering when it reaches about 7 feet (2.1 meters) in height.

The fruit it bears is elongated and has a vibrant yellow skin when fully ripe. The flavor profile of the Goldfinger Banana is exquisite, with a rich and sweet taste complemented by hints of tropical flavors.

Its firm and creamy texture enhances the overall culinary experience, making it a highly desirable choice for both fresh consumption and culinary uses.

You may not be about to grow bananas in Florida quite this big unless you're in the Keys

Lady Finger

The Lady Finger Banana (Musa acuminata ‘Lady Finger‘) is a distinguished banana variety appreciated for its petite size and delectable fruit. Also known as “Sucrier” or “Sugar Banana,” this cultivar is treasured for its sweetness and fine texture.

The Lady Finger Banana typically grows to a height of 6 to 8 feet (1.8 to 2.4 meters) at maturity, with a spread of approximately 3 to 5 feet (0.9 to 1.5 meters). It displays an upright growth habit, producing slender leaves that add an elegant touch to any garden. This variety takes around 12 to 16 months to reach maturity and begin flowering.

The fruit of the Lady Finger Banana is small and cylindrical, with a thin golden-yellow skin when fully ripe. Its flesh is creamy and tender, offering a delectable balance of sweetness and subtle tanginess.

The Lady Finger Banana is often praised for its dessert-like flavor, reminiscent of vanilla and honey. Its petite size and exceptional taste make it a favorite choice for enjoying fresh or incorporating into various culinary creations.

Mona Lisa

The Mona Lisa Banana (FHIA-2) is a captivating banana variety that stands out for its exceptional flavor and ornamental features. This hybrid cultivar, bred from the Honduran Foundation for Agricultural Research (FHIA), offers both aesthetic appeal and delectable fruit.

The Mona Lisa Banana grows to a height of about 10 to 12 feet (3 to 3.6 meters) at maturity, with a spread of approximately 5 to 6 feet (1.5 to 1.8 meters). It showcases large, lush green leaves that create a tropical ambiance in any garden. This variety typically takes around 12 to 14 months to reach maturity and start flowering.

The fruit of the Mona Lisa Banana is medium-sized, with a slightly curved shape and a vibrant yellow color when ripe. Its flavor profile is highly regarded, characterized by a rich, sweet taste with hints of caramel and hints of citrus. The fruit’s creamy texture further enhances the eating experience.

The Mona Lisa Banana excels as a dessert banana due to its delectable flavor and also adds an aesthetic appeal to landscapes and gardens with its lush foliage and graceful presence.

Honey Bananas

Honey Banana (Musa johnsii) is a unique and lesser-known banana variety that offers a delightful taste and distinctive characteristics. This species is highly regarded for its exceptional sweetness, earning its name “Honey Banana.”

The Honey Banana plant reaches a height of about 6 to 8 feet (1.8 to 2.4 meters) at maturity, with a spread of around 3 to 4 feet (0.9 to 1.2 meters). It displays a compact growth habit, making it suitable for smaller gardens or container cultivation. The time it takes for Honey Bananas to reach maturity and start flowering is approximately 12 to 14 months.

The fruit of the Honey Banana is medium-sized with a slender shape and a bright yellow skin when fully ripe. Its flavor is the highlight, characterized by an intense sweetness reminiscent of honey, along with subtle floral notes. The Honey Banana’s velvety smooth texture adds to the overall eating experience.

While not as widely known as some other banana varieties, the Honey Banana surprises with its unique flavor profile, making it a delightful choice for those seeking a distinct and sweet tropical treat.

Blue Java

The Blue Java banana (Musa acuminata × balbisiana ‘Blue Java’) is a fascinating and sought-after banana variety, renowned for its unusual blue-green coloration and distinctive flavor. This cultivar, often referred to as the “Ice Cream Banana,” offers a unique combination of visual appeal and delectable taste.

The Blue Java banana plant reaches a height of 10 to 20 feet (3 to 6 meters) at maturity, with a spread of approximately 6 to 8 feet (1.8 to 2.4 meters). It displays a robust growth habit, with large, sturdy leaves that create a lush tropical atmosphere. The time it takes for the Blue Java banana to grow to maturity and start flowering is typically around 12 to 20 months.

The fruit of the Blue Java banana is medium-sized, with a thick, pale blue-green skin when fully ripe. Its flavor is what sets it apart, often described as resembling vanilla ice cream or custard. The flesh is creamy and velvety, offering a rich and sweet taste with subtle hints of vanilla.

The Blue Java banana’s unique flavor profile, combined with its visually stunning appearance, makes it a highly sought-after variety among banana enthusiasts and a true delight for those seeking a tropical treat with a twist.

Plantains vs. Bananas

Plantains, often confused with bananas, are a versatile staple in tropical cuisine. While they resemble bananas, plantains require different cooking methods due to their starchier texture. Plantains are often cooked before consumption and used in various savory dishes.

Best Plantain Bananas to Grow in Florida

To enjoy the goodness of plantains in your Florida garden, consider these top varieties:

Platano Burro

Well-adapted to Florida’s climate, this plantain variety offers large, starchy fruit with a mildly sweet flavor.

Platano Burro (Musa paradisiaca), also known as the “Burro Banana” or “Horse Banana,” is a popular plantain variety valued for its versatility and distinct flavor. Unlike sweet bananas, the Platano Burro is primarily used for cooking due to its starchy nature.

This plantain cultivar grows to a height of 15 to 20 feet (4.5 to 6 meters) at maturity, with a spread of approximately 10 to 15 feet (3 to 4.5 meters). It displays large, broad leaves that provide a tropical ambiance to the landscape. The time it takes for the Platano Burro to reach maturity and start flowering is typically around 12 to 16 months.

The fruit of the Platano Burro is larger and more angular compared to sweet bananas, with a thick green skin that turns yellow-black as it ripens. When cooked, the fruit takes on a soft and creamy texture, perfect for making delicious dishes such as plantain chips, mashed plantains, or plantain fritters.

The flavor profile of the Platano Burro is unique, offering a mild, slightly sweet taste with subtle hints of tanginess. Its versatility in various culinary applications, combined with its hearty and flavorful nature, makes the Platano Burro a favored choice among those seeking to explore the world of plantain-based cuisine.

Saba

Thriving in Florida’s warm climate, Saba plantains produce large, starchy fruit perfect for cooking and frying.

The Saba Plantain (Musa acuminata × balbisiana ‘Saba’) is a popular and robust plantain variety cherished for its versatility in both cooking and baking. This hybrid cultivar, known for its large size and starchy texture, is highly valued in tropical cuisines.

The Saba Plantain grows into a sizeable plant, reaching heights of 15 to 20 feet (4.5 to 6 meters) at maturity, with a spread of approximately 10 to 15 feet (3 to 4.5 meters). It showcases broad leaves that create a lush and tropical atmosphere in the garden. The time it takes for the Saba Plantain to mature and start flowering typically ranges from 10 to 14 months.

The fruit of the Saba Plantain is elongated and thick-skinned, transitioning from green to yellow-black as it ripens. Unlike dessert bananas, the Saba Plantain is not typically consumed raw due to its starchy nature. When cooked, however, it transforms into a delectable treat. The flavor profile of the Saba Plantain is characterized by a mildly sweet taste and a dense, creamy texture.

Its versatility makes it ideal for a wide range of culinary creations, from savory plantain chips and stews to delectable plantain bread or cakes. The Saba Plantain’s substantial size, adaptability, and hearty flavor make it a staple ingredient in many tropical cuisines and a favorite among plantain enthusiasts.

How to Grow the Best Tasting Bananas

To ensure your banana plants thrive, it’s essential to understand the environmental factors that influence their growth:

Temperatures

Bananas thrive in consistently warm to hot conditions. The optimal temperatures are between 78°F to 82°F, although they fruit best at 84°F to 86°F.

When temperatures drop below 60°F, the growth of banana plants slows down, and it completely stops at 50°F. So, you won’t see much progress on your bananas during the winter.

Unfortunately, cooler winter days can really stunt the growth of your banana fruits when temperatures are between 32°F and 50°F.

The plants themselves can become damaged when temperatures drop below freezing for many hours. Signs of freeze damage include the death of leaves and browning of the trunk and fruit.

Temps below 28°F (-2°C) may even kill the plants, but they usually regrow from the underground rhizome once warm weather returns.

On the other hand, excessively high temperatures at or above 98°F (37°C) can lead to leaf scorch, and newly emerging leaves may appear very narrow. This is why you may want to consider planting your bananas in some dappled shade if you’re in South Florida.

Sun and Wind Exposure

Wind can damage banana leaves, so consider planting in a sheltered location or using windbreaks. This may also provide some protection from summer scorching.

Bananas thrive in full sun but can tolerate partial shade, especially during the hottest part of the day.

Drought and Flooding: While bananas prefer consistent moisture, they can tolerate short periods of drought. Avoid waterlogged conditions.

Grow Bananas in Florida Soil

Bananas thrive in well-drained soil rich in organic matter. Sandy loam soils are ideal, but heavy clay soils can be amended with organic matter to improve drainage. Add compost or well-rotted manure to enhance soil fertility.

Bananas are sensitive to high salt levels in the soil. Choose well-draining soils with low salinity.

When to Grow Bananas in Florida

The ideal time to plant bananas in Florida varies by zone:

  • Zone 8: Plant bananas in early spring after the threat of frost has passed.
  • Zone 9: Plant in late winter or early spring.
  • Zone 10: Plant year-round, avoiding the hottest months of summer.

Circle the Bananas

Banana circles, also known as banana pits or banana circles, have gained popularity among permaculture enthusiasts as an innovative and sustainable way to grow bananas.

This method draws inspiration from traditional agricultural practices found in various cultures around the world. While the exact origins of banana circles are difficult to trace, their use can be seen in regions such as Southeast Asia, Africa, and South America, where bananas have been cultivated for centuries.

The concept behind banana circles revolves around creating a self-sustaining ecosystem that mimics the natural conditions in which bananas thrive. It involves digging a circular pit in the ground and gradually building up layers of organic matter within it. The organic materials used can include kitchen scraps, compost, mulch, leaves, straw, animal manure, and any other biodegradable waste readily available. As these materials decompose, they release nutrients into the soil, creating a fertile environment for banana plants.

Banana circles offer several advantages for banana cultivation. Firstly, the circular shape provides an efficient use of space, allowing multiple banana plants to be grown in a compact area. This is especially beneficial for home gardeners with limited space.

Additionally, the layers of organic matter create a moisture-retaining and nutrient-rich environment, reducing the need for frequent watering and fertilization. The organic matter also acts as a mulch, helping to suppress weeds and maintain soil moisture levels.

Banana circles are a holistic way to grow bananas in Florida and they utilize natural processes and recycle organic waste. They promote soil health, conserve water, and encourage biodiversity by creating microhabitats that attract beneficial insects and microorganisms.

Banana circles contribute to the overall resilience of the garden ecosystem, as the decomposing organic matter feeds not only the banana plants but also neighboring plants and soil organisms.

These circles not only provide an abundant harvest of bananas but also provide a lightly shaded understory for growing more sun-sensitive plants in rich and fertile soil.

Planting a Banana Circle

Creating a banana circle, as practiced in permaculture, can optimize growth and provide a sustainable environment for your banana plants. Follow these simple steps to create a banana circle:

  1. Choose a sunny or partially shaded location that is somewhat sheltered from harsh or excess wings.
  2. Dig a circular trench approximately 1-3 feet deep and 3 feet wide.
  3. Place organic matter, such as leaves or compost, kitchen scraps, composted manure, etc. in the bottom of the trench.
  4. Plant your banana pups around the inner edge of the circle, leaving space for growth.
  5. Backfill the trench with soil and water thoroughly.
  6. Mulch the area around the circle to conserve moisture and suppress weeds.

Care Tips for the Best Tasting Banana

To ensure healthy and fruitful banana plants, follow these care tips:

Feeding Your Bananas

Fertilizing bananas is essential for promoting healthy growth and maximizing fruit production. The timing and nutrient requirements may vary based on the growth stage and the specific USDA growing zone in Florida. In general, it is recommended to fertilize bananas during the active growing season, which typically spans from spring to early fall.

USDA Zone 8

For USDA Zone 8, it is advisable to apply fertilizer in early spring, around March or April, to provide the necessary nutrients for robust growth. Repeat the application every six to eight weeks until early fall.

USDA Zone 9

In USDA Zone 9, where the growing season is longer, you can begin fertilizing in late winter or early spring, around February or March. Continue fertilization every six to eight weeks throughout the growing season.

USDA Zone 10

In USDA Zone 10, with its year-round warm climate, bananas benefit from regular fertilization. Begin fertilizing in early spring and continue every six to eight weeks, maintaining a consistent nutrient supply.

The Macros and Micros

When it comes to nutrient requirements, bananas have specific needs to thrive. The primary macronutrients required are nitrogen (N), phosphorus (P), and potassium (K). The recommended NPK formula for edible bananas is generally around 3-1-6 or 2-1-6. This means that the fertilizer should have a higher potassium content compared to nitrogen and phosphorus. This balanced ratio helps promote healthy foliage growth, sturdy stems, and enhanced fruit development.

In addition to the macronutrients, bananas also require various micronutrients for optimal growth. Some essential micronutrients for bananas include magnesium (Mg), iron (Fe), manganese (Mn), zinc (Zn), copper (Cu), and boron (B). These micronutrients play crucial roles in enzyme activation, chlorophyll production, and overall plant health. It is recommended to use a fertilizer that includes these micronutrients in its formulation or supplement with micronutrient-specific products as needed.

Organic Fertilizer for Bananas

For those preferring organic alternatives to commercial fertilizers, several options are available. Organic materials such as compost, well-rotted manure, and worm castings can provide a rich source of nutrients for bananas. Additionally, organic fertilizers made from natural sources like fish emulsion, seaweed extracts, and bone meal can be effective in meeting the nutritional needs of banana plants. These organic alternatives offer sustainable options while nourishing the soil and supporting healthy growth.

Irrigation for Bananas

Bananas require consistent moisture. Provide regular deep watering to keep the soil evenly moist.

Mulching helps suppress weeds and conserve moisture. Use chop and drop when trimming browned leaves. They will break down in the soil and provide nutrients while helping to retain moisture in the soil until they do.

It’s especially important to provide water throughout the winter and spring in Central and South Florida. Once you pass your last freeze date, you’ll need to water your bananas regularly until the rainy season begins.

How to Harvest Your Banana Crop

Bananas typically take around 9-15 months to mature, depending on the variety. Once the flower has produced as much fruit as it will, the bananas will begin to grow larger and become plump.

At this point, you can cut off the remaining flower if you like. I haven’t noticed any difference between leaving them on or cutting them off. Many people enjoy eating banana flowers in regional dishes, but I normally cut them down to prevent stressing the pseudostem. I drop them into the middle of the circle to compost.

Once they reach their mature size, the top bananas on the stalk will begin to turn yellow. That’s when it’s time to harvest.

You can harvest each hand of bananas individually as they become ripe, if you choose. Cut them from the stalk with a sharp knife.

Alternatively, you can harvest the whole stalk by cutting it about 10-12″ above the top hand of bananas. You can hang them up in a utility room or garage to finish ripening.

Note that the bananas will begin to fall off the stem as they ripen, so you’ll want to make sure you harvest them regularly so you don’t end up with a pile of rotten bananas under the stalk.

The Tragedy of Bananas

Once a banana plants fruits, it will die off. So, you won’t get any more bananas from the same plant once it has. However, you will get new banana plants growing from the rhizomes below.

Many times, you’ll see several pop up before the plant even blooms, which is reassuring when you realize that the plant will die after fruiting.

I’ve noticed that Dwarf Cavendish will definitely throw out two or three pups before blooming. I have a few other varieties that I’ve forgotten the names of that don’t send up pups as prolifically.

Sometimes you’ll get more pups from the rhizome, even though the mother plant appears to be completely dead. If you’re using the banana circle method, allow the “tree” to brown and dry out completely. Once it is completely dead, you can just push it over and allow it to gently decompose within the circle.

Time to Grow Bananas in Florida

By now, you’re equipped with the knowledge you need to grow bananas in your Florida garden. Take advantage of the summer rainy season to get your own mini-plantation going this summer.

Roll up your sleeves, get your hands dirty, and embrace the joy of growing bananas in Florida. Start your journey towards self-sustainability and enjoy the delectable flavors of homegrown tropical fruits right in your own backyard. Happy gardening!

Posted on

Grow Sweet Potatoes in Florida

Grow sweet potatoes in Florida

I have to admit it — I have an embarrassingly gullible sweet tooth. Always have had. So, when I first discovered sweet potatoes as a kid, I was hooked. A vegetable that tastes like dessert — it doesn’t get any better than that. I still have a sweet tooth, and when I discovered I could grow sweet potatoes in Florida year-round, I became doubly hooked.

In fact, the ability to grow sweet potatoes, bananas, and pineapples in my backyard is probably the reason I still live in Florida. In the face of increasing heat and some increasingly scary weather. In the face of skyrocketing housing and insurance costs. In the face of the — let’s admit it — pretty awful and kind of unfair reputation we residents of the state have amongst the rest of the world.

But I get sweet potatoes and bananas and pineapples (sometimes) out of my sandy dirt, and that makes it all worth it.

Sweet potatoes are not only delicious but incredibly nutritious. They’re one of the few familiar and beloved staple foods we can grow in abundance in subtropical regions like Florida.

One of the reasons I blog about the plants I grow (and those I just want to grow) is to remind myself of all the details and shortcuts I’ve discovered over the years. It helps me to remember when I share on my blog, and so many (too many!) times I simply forget that I need to plant things a certain way by a certain time.

So, I’m going to cover what I know about sweet potatoes here. Although you can grow sweet potatoes in Florida at any time of year, the summer months are really the last chance you’ll have to plant them in time for those sweet-potato-eating holidays we all know and love around the end of the calendar year.

So, let’s get started…

Sweet Potatoes Have a Backstory

Growing sweet potatoes in Florida

Sweet potatoes (Ipomoea batatas) are native to Central and South America. They’re most closely related to morning glories, not white potatoes.

Morning glories and moonflowers (both Ipomea species) are native to Florida, so our state is a prime candidate for sweet potato production.

I remember reading that, many years ago, Florida farmers grew Irish (white) potatoes from January to April, then sweet potatoes from May to November. It was one of the state’s most profitable crops.

(Why or how we bothered to go into the orange juice business is a mystery to me.)

Sweet potatoes have a sprawling growth habit that covers lots of ground and produces cute little pinkish-purple flowers that resemble those of their cousins, the morning glory. Most importantly, they produce delicious edible tubers.

History and Spread of Sweet Potatoes:

Sweet potatoes have a rich history dating at least 5,000 years. They were first domesticated in Central or South America, and eventually even ended up in Polynesia (archeologists are still trying to figure out how, although “boat” is the KISS answer to that one.)

When you have something as awesome as sweet potatoes, word gets around. Soon, anywhere on the planet with a long enough warm season to grow them was producing their own crops.

Over time, sweet potatoes became a valuable crop, adapting to different growing conditions and evolving into numerous cultivated varieties.

Sweet Potato Varieties for Florida

There are several popular cultivars of sweet potatoes grown for food in the United States. Here are some noteworthy varieties:

Beauregard

Beauregard sweet potatoes have a vining growth habit, producing long and sprawling vines that can spread across the garden. They require ample space to grow and are often trained along trellises or allowed to spread on the ground.

They’re relatively easy to grow, making them a popular choice among home gardeners and farmers. They also have good resistance to pests and diseases, and their vigorous vines provide good ground cover, suppressing weed growth and protecting the soil from excess sun and heat.

Beauregard sweet potatoes were developed at Louisiana State University and released in 1987. Since then, they’ve become one of the most widely grown sweet potato cultivars.

Beauregard sweet potatoes have a reddish-brown skin and a bright orange flesh. The skin is relatively smooth and easy to peel, while the flesh is firm and moist.

Beauregard sweet potatoes are smooth and creamy when cooked. Not too dry and not too moist, they’re pretty versatile in the kitchen.

They have a sweet and nutty flavor with hints of honey and caramel. They are known for their pleasing taste, and their flavor intensifies when cooked. They’re sweet, but not TOO sweet, with a well-rounded flavor.

Centennial

Centennial sweet potatoes have a vining growth habit similar to Beauregard. They produce long, sprawling vines that require ample space to grow and spread. You can trellis them or allow them to spread on the ground.

They’re relatively easy to grow and are well-suited to the Florida climate. They have good resistance to pests and diseases and can thrive with proper care.

Centennial sweet potatoes were also developed at Louisiana State University and released in 1967. They have a light coppery skin color with a pale orange flesh. The skin is smooth and thin, making it easy to handle.

Centennial sweet potatoes are creamy and moister than Beauregards. They has a smooth, velvety texture when cooked and they’re not overly fibrous.

They have a mildly sweet flavor with a subtle nuttiness. They are not overly sugary and have a pleasant balance between sweetness and earthiness.

Vardaman

Vardaman sweet potatoes are a bush variety, meaning they have compact growth and shorter vines. They don’t require as much space as vining varieties. If you’re growing in a small garden or in containers, they’re your best choice.

They’re generally easy to grow and suitable for the Florida climate. They have good resistance to pests and diseases, making them a reliable choice for gardeners.

Vardaman sweet potatoes were developed at the Mississippi Agricultural and Forestry Experiment Station and were released in 1982.

These tubers have a reddish-brown skin color with a light yellow flesh that darkens once removed from the soil. The skin is slightly rough and may have shallow indentations.

Vardaman sweet potatoes are moderately firm and moist. They have a smooth texture when cooked but may have a slightly drier consistency compared to some other sweet potato cultivars.

Vardaman sweet potatoes have a rich, sweet flavor with hints of honey and caramel. They are known for their intense sweetness, making them a favorite among those who prefer sweeter varieties. The flavor is often described as luscious and candy-like, perfect for indulgent holiday meals.

All three cultivars thrive in Florida’s climate, and all three offer different flavors and textures. All three are listed on the UF/IFAS University of Florida Gardening Solutions website as the best sweet potato varieties for Florida gardeners.

Some other varieties to experiment with include:

Georgia Jet

Reddish-orange skin and sweet, moist flesh. It matures relatively quickly and is well-suited for shorter growing seasons. Good disease resistance and adaptability.

Murasaki

Striking purple skin and creamy white flesh, they offer a slightly drier texture and a unique, nutty flavor. This variety originates from Japan and has gained popularity for its vibrant color and distinctive taste.

Bonita

Tan skin and light-colored flesh, they have a smooth texture and mild nutty flavor. This newer variety is gaining attention for its versatility in both savory and sweet dishes.

Growing Sweet Potato Slips

Sweet potato slips are the young shoots that are grown from a mature sweet potato. These slips can be transplanted into the garden or containers to grow into full-sized sweet potato plants.

Many gardening gurus and ag experts will tell you to purchase certified, disease-free sweet potato slips to plant in your garden. That’s always a safe bet, but the last couple of years have shown us that you can’t always get what you want – sometimes, you can’t even order it online.

If you can’t find them for sale (or choose not to buy them), it’s really easy to grow your own sweet potato slips. The only real disadvantage is that it takes quite a long time. It has often taken me up to two months to get slips, which means that if you haven’t started early enough and decide to buy the, it’s likely there won’t be any for sale left anyway.

Growing Your Own Slips

If you want to try growing your own slips, here are two methods used:

Water glass method for growing sweet potato slips

The water glass method involves suspending the sweet potato in water to encourage the growth of slips. Here’s how you can do it:

  • Select a healthy, medium-sized sweet potato. Ensure that it is free from blemishes or rot.
  • Place the sweet potato horizontally in a glass jar or container, partially submerged in water. Use toothpicks or skewers inserted into the sides of the sweet potato to hold it in place, ensuring that the bottom end is submerged.
  • Place the jar or container in a warm location that receives ample sunlight. A windowsill or a sunny spot indoors is ideal.
  • Change the water every few days to prevent stagnation and maintain cleanliness.
  • After a couple of weeks, small sprouts known as slips will begin to emerge from the sweet potato. Allow them to grow to a height of 4 to 6 inches (10 to 15 cm).
  • Carefully remove the slips from the sweet potato, gently twisting them to detach them from the parent tuber.
  • Place the slips in a small cup of water for a few days to encourage root growth.

Once the roots have developed, the slips are ready for transplanting into well-prepared soil in the garden or containers.

Potting Soil Method for growing sweet potato slips

The potting soil method involves directly planting the sweet potato in a container with potting soil to encourage slip growth. Here’s how you can do it:

  • Fill a shallow container or pot with well-draining potting soil about halfway.
  • Lay your sweet potatoes on their sides and cover it the rest of the way with potting mix.
  • Place the container in a warm location that receives ample sunlight, such as a sunny windowsill or a greenhouse.
  • Keep the soil slightly moist but not waterlogged. Water when the top inch of soil feels dry to the touch.
  • After a few weeks, slips will start emerging from the sweet potato and grow above the soil surface.
  • Allow the slips to reach a length of 10 to 12 inches before gently detaching them from the sweet potato.
  • Carefully remove the slips from the soil, ensuring that you don’t damage their delicate roots.
  • Transplant the slips into individual pots or directly into well-prepared garden soil.

Both of these methods work. I prefer the potting soil method because I believe you get better root growth in soil than when propagating in water.

However, you should choose whichever method that suits you and your available resources best.

Grow Sweet Potatoes in the Florida Garden

Sweet potatoes are a long-season plant and take some months to mature. Depending on the variety, they can take from 90 to 120 days to form adequate tubers.

Sweet potatoes need a warm climate with temperatures between 75-95°F. They require well-draining soil, full sun, and moderate humidity.

Zone 8: In Zone 8 of Florida, plant sweet potatoes from mid-April to late May.

Zone 9: In Zone 9, the recommended planting time is from early March to mid-May.

Zone 10: Gardeners in Zone 10 can plant sweet potatoes from late February to early June.

These planting schedules reflect timing that lets you harvest mature tubers before any chance of freeze in December. However, note that in many parts of Central Florida and all parts of South Florida, you can plant sweet potatoes at any time of year. You may just not be able to harvest them before a freeze.

In Zones 9 and 10, sweet potatoes are frequently perennial and will simply bounce back from any freeze, even if the foliage dies off.

Even during the three nights of freeze and one night of near-freeze last December 2022, none of my sweet potatoes died back at all.

Plot Preparation for Sweet Potatoes:

Sweet potatoes prefer plenty of space to grow. Clear the area of any weeds or vegetation.

You may need to loosen the soil to a depth of 8-10 inches, if it’s badly compacted. You can take the opportunity to add compost and any other soil amendments.

If you are planning well ahead, you can also prepare your plot with the Back to Eden method or use the No-Dig prep method by covering your future potato patch with cardboard and a thick layer of compost or mulch.

Water the area down well and regularly, and you should be able to plant into it in about 4 to 5 months.

Best Growing Conditions for Sweet Potatoes

Sweet potatoes aren’t picky, but you’ll want to give them good growing conditions for optimum yield.

Soil

Sweet potatoes thrive in loose, sandy soil rich in organic matter. Aim for a pH range of 5.8-6.2 for optimal nutrient availability.

Light

Provide full sun exposure to ensure vigorous growth and maximum tuber development.

Temperatures

Sweet potatoes prefer warm temperatures between 75-95°F (24-35°C). They are sensitive to frost, so wait until your last frost date to get them started in the ground. Mature plants are more hardy than newly planted slips.

Water

Sweet potato slips should be well watered when first planted in the ground. If you’re planting before the beginning of the rainy season in June (and most people do), you may need to water every day until they are well established and beginning to vine over the beds.

Afterward, provide consistent moisture. You may need to water two or three times a week if it doesn’t rain.

Planting Sweet Potato Slips:

Dig a small hole for your sweet potato slips 12-18 inches apart. You can plant in grids or in rows, as best fits your garden space.

If you haven’t amended the soil, you may want to dig in a little Espoma BioTone to help your plants get established and strong.

Bury the slips halfway into the soil, leaving the top half exposed.

Water thoroughly after planting to settle the soil.

Caring for Sweet Potato Plants

Care after planting out is pretty straightforward.

Mulching

Applying a layer of organic mulch, such as straw or wood chips, will help to retain moisture, suppress weeds, and maintain an even soil temperature.

Fertilization

Sweet potatoes benefit from regular feeding. Use a balanced fertilizer or organic amendments rich in phosphorus and potassium.

Pruning

Prune back any excess vines or suckers to focus energy on tuber development. They will try to crawl away and root down the length of the vine, which reduces the yield of tubers.

I recall one very experienced Florida gardener of my acquaintance said never to let them root more than three nodes from the planting spot.

Well, I think that’s what she said.

Besides, you can also prune them back and eat the greens if you like. (I compost them or feed them to my bunnies, which is really the same thing when I think about it.)

Pest and Disease Control

Monitor for pests like sweet potato weevils and aphids. Sweet potato flea beetles can eat up the leaves. Employ organic pest control methods when necessary. Cypress and eucalyptus mulch can deter weevils. And nasturtiums make a good trap crop for aphids.

Tips for Increasing Yields on Sweet Potatoes

  • Provide adequate spacing between plants for good airflow and tuber expansion.
  • Prune back excess vine growth.
  • Improve soil with organic matter and appropriate fertilizers.
  • Ensure consistent moisture throughout the growing season.

Harvesting Sweet Potatoes

You can begin to harvest your sweet potatoes when the vines start to yellow and die back, typically around 90-120 days after planting.

Gently loosen the soil around the base of the plant and carefully lift the tubers using a garden fork or spade.

Handle sweet potatoes with care to avoid bruising or cutting the tubers.

Do not wash your sweet potatoes. You’ll want to cure them first, and then wash them when you’re ready to eat them. You can vigorously brush off any dirt if you like, but be careful of cutting or scraping away the skin.

Curing Sweet Potatoes:

Curing sweet potatoes after harvest improves their flavor, texture, and storage life. What you want is for them to cure in a warm, humid area for about a week or even two.

You can cure sweet potatoes outdoors by laying them in a single layer on the ground, preferably on a dry, warm surface, for 4-7 days. However, you’ll want to gather them up or cover them up if it rains.

You can also place sweet potatoes in a warm, well-ventilated space, such as a basement or garage, with a temperature of 85-90°F (29-32°C) and 85-90% humidity for 4-7 days. You can use a small room or closet with a space heater and a humidifier.

I’ve cured mine at lower temperatures for about two weeks at 76°F to 78°F with good results. I packed them loosely in a crate, padded with crumpled paper to keep them from touching.  

And They’re Good For You, To Boot

The nutritional breakdown of sweet potatoes is pretty impressive for something that tastes so good. A 1-cup serving of cooked sweet potatoes contains approximately:

  • Calories: 180
  • Carbohydrates: 41 grams
  • Fiber: 6 grams
  • Protein: 4 grams
  • Fat: 0 grams
  • Vitamin A: 769% of the daily recommended intake (DRI)
  • Vitamin C: 65% of the DRI
  • Potassium: 18% of the DRI
  • Calcium: 4% of the DRI
  • Iron: 6% of the DRI

If you’re serious about growing your own food in Florida and aren’t sure where to start, sweet potatoes offer an answer. Not only are they very well suited to the climate, but they’ll also grow through the summer here when precious little else does.

Whether you’re growing them as a staple source of calories or because you have a sweet tooth like I do, they’re definitely worth trying.